

Are Iphone Cameras Good Enough For Headshots
Are you using your iPhone camera features to their full potential? Some iPhone camera settings are so well hidden that you might non even realize they exist. But once you find them, y'all'll be able to take your photography to a whole new level. Read on to discover 10 subconscious iPhone camera features that will dramatically improve your photos… and requite you ultimate control over your iPhone camera.
Tabular array Of Contents: 10 Hidden iPhone Camera Features
Click any title link below to go straight to that section of the article:
1. Quickly Admission Your iPhone Camera
two. Switch On The Camera Grid For Amend Compositions
3. Set up Focus & Exposure For Loftier-Quality Images
4. Apply Flare-up Mode For Incredible Activeness Shots
5. Create Stunning Long Exposures With Live Photos
6. Capture Beautifully Blurred Backgrounds With Portrait Mode
7. Utilize HDR To Capture More Color & Detail In Your Photos
8. Take Photos With The Volume Buttons
9. Shoot Discreetly Using Your Apple Headphones
ten. Record The Location Of Your Photos (And View Them On A Map!)
1. Quickly Access Your iPhone Camera
Do you oft miss a great shot because you tin can't open up the iPhone Photographic camera app quickly enough? It doesn't have to be this mode!
There'southward a uncomplicated style to open the iPhone's native camera app in less than a second. You lot don't even accept to enter your passcode to unlock your phone.
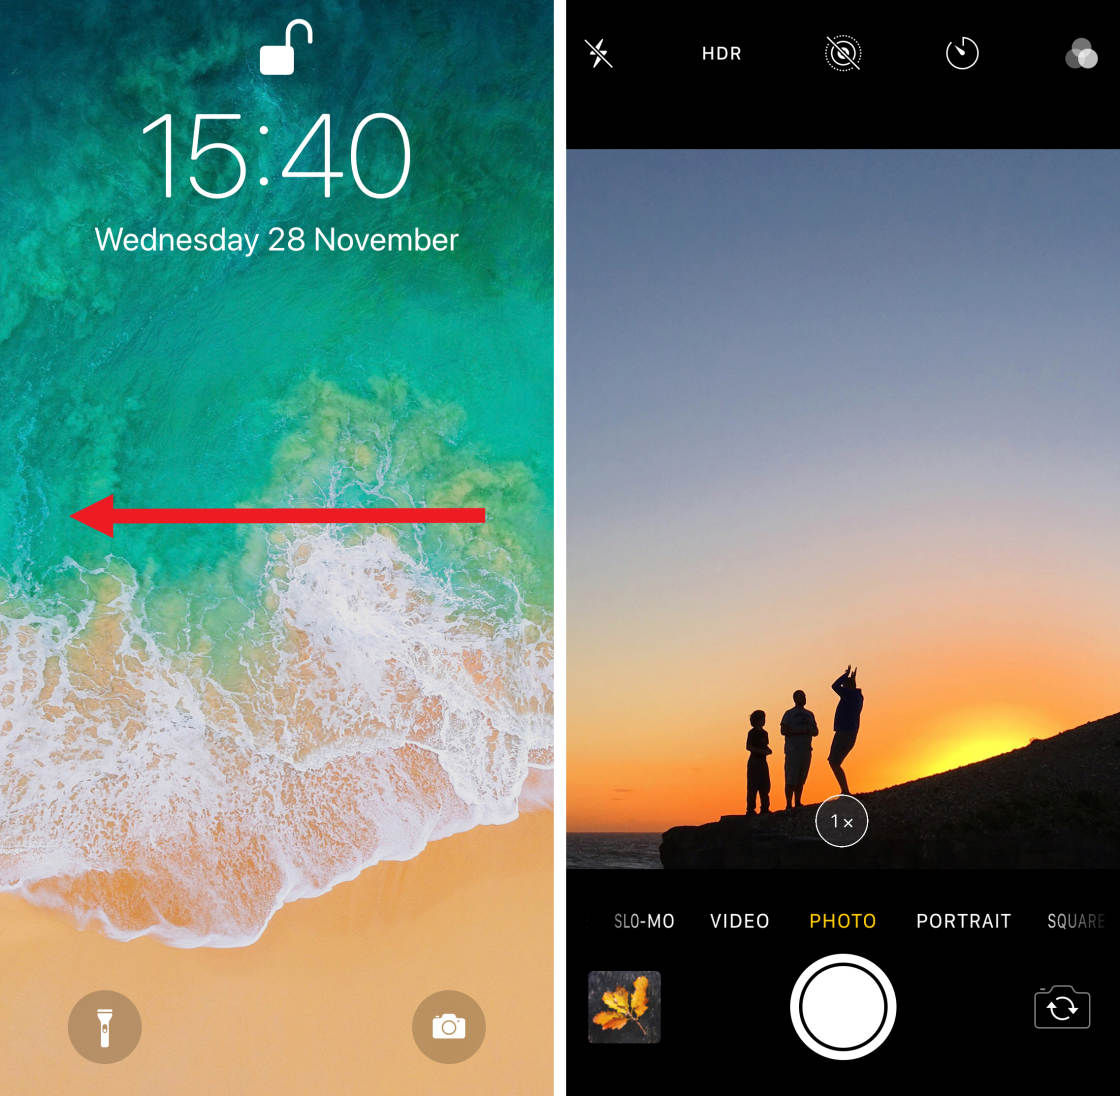
When your iPhone is locked, wake up the phone by borer the screen or pressing the Power button. (On iPhones that have the round Home button at the lesser of the screen, you tin press the Habitation push button instead.)
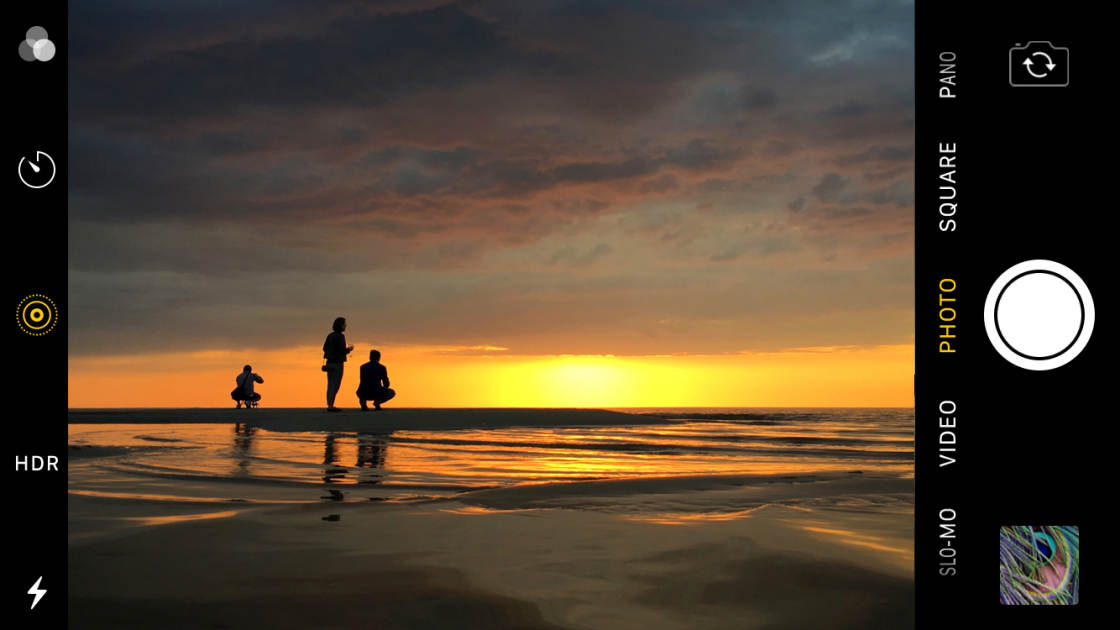
And so only swipe left across the lock screen to open up the Camera app.
There are some other quick methods to open the Camera app. This video from my iPhone Photograph Academy online course shows you 3 ways to open your iPhone's photographic camera. Click hither to find out more nearly iPhone Photo Academy.
In my iPhone Photograph Academy online form, yous'll detect how to create stunning pictures with your iPhone. Join at present and start taking incredible iPhone photos that everyone adores.

To open the Camera app when you're already using your iPhone, apply i of the methods below.
If y'all can see the Home screen, tap the Camera app icon. It's a good idea to add the Camera icon to the dock at the bottom of the screen. This makes it easy to find, allowing y'all to open up the camera equally speedily as possible.

Add together it to the dock by tapping and holding the Camera icon until it starts to jiggle. Drag information technology to the dock at the bottom of the screen, and so tap Done (or printing the Home push on older iPhones).
If you're using an app and all of a sudden desire to take a photo, you lot don't have to close the app to get back to the Dwelling house screen.
Instead, open the Command Center past swiping downwards from the top correct. (On older iPhones, swipe up from the lesser of the screen.)
In the Command Center, tap the Photographic camera icon and you're ready to shoot!

These iPhone photographic camera tricks allow you to start shooting in only a 2nd or two. And so you'll always be ready to shoot when a slap-up photo opportunity arises.
2. Switch On The Camera Filigree For Meliorate Compositions
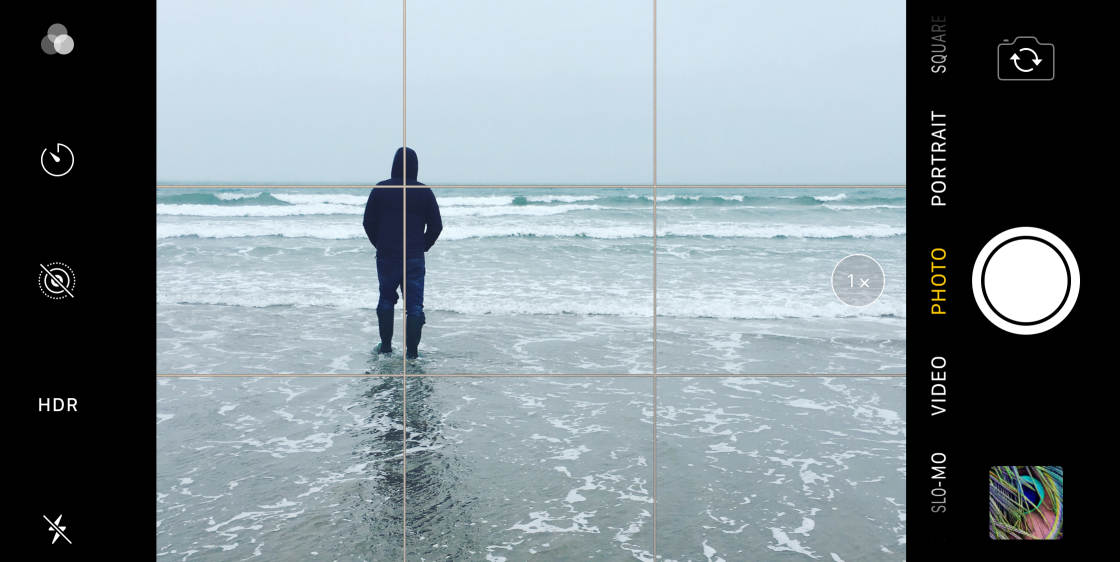
Did you know yous tin can display a filigree on the iPhone camera screen? This is an amazing tool for helping y'all compose your photos.
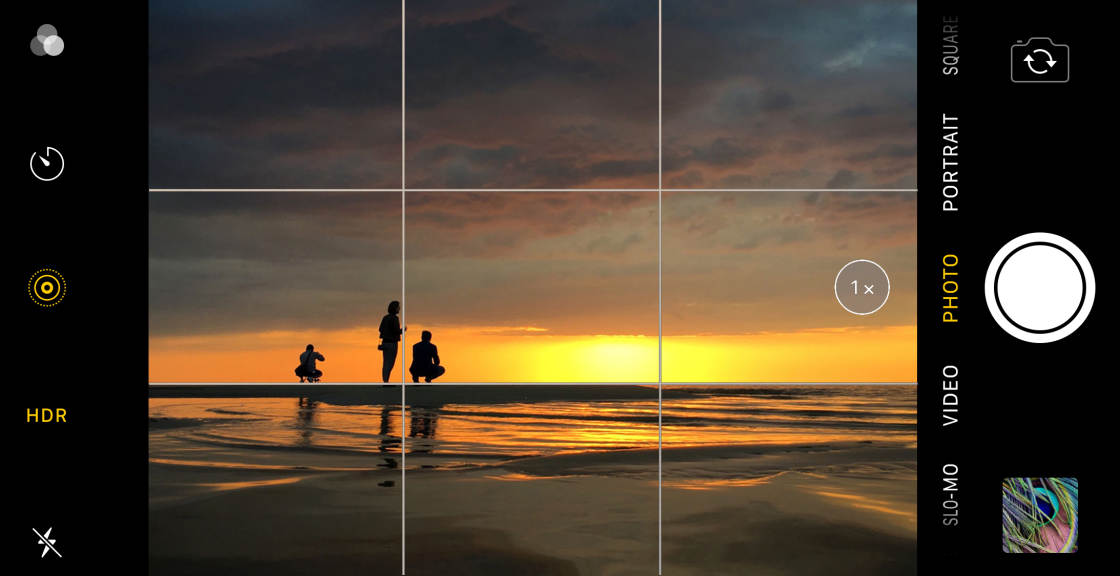
It ensures y'all get horizons level in your mural photos. And you tin utilise information technology to compose your shot according to the rule of thirds.
The rule of thirds is a classic limerick technique. Information technology states that your photo will look more pleasing if you position your subject field or horizon off-centre.
Use the grid to position the horizon along i of the horizontal gridlines. Or place your subject at one of the intersections where the lines meet.
To turn on the camera grid, open the Settings app, select Camera, and make certain the Grid selection is on (green).
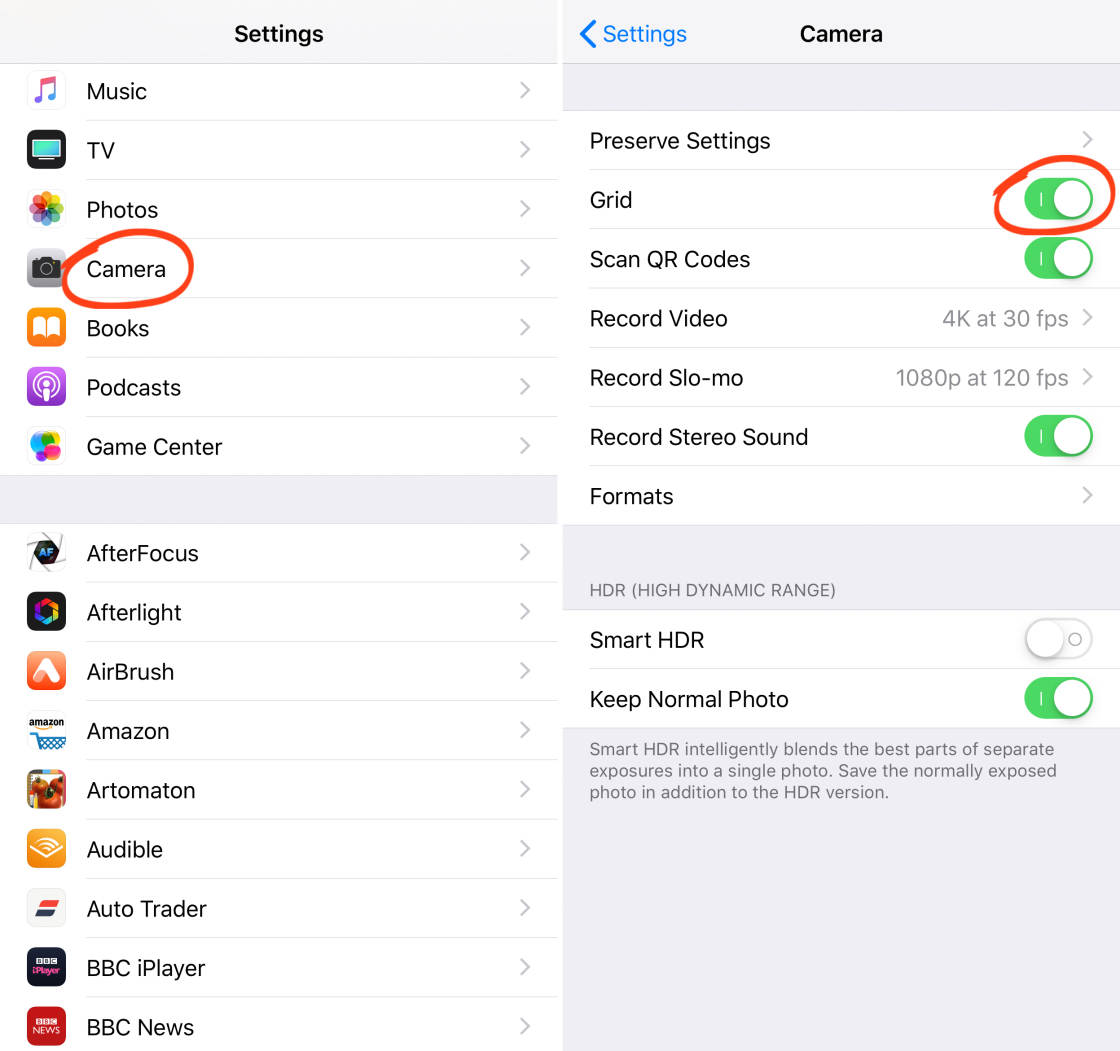
When you switch on the grid, the leveling tool is too activated. This tool helps you have perfectly level photos when shooting straight up or down.
It's ideal for still life flat-lays or food photography where y'all're shooting from above. And it's useful if you want to shoot straight upward above yous.
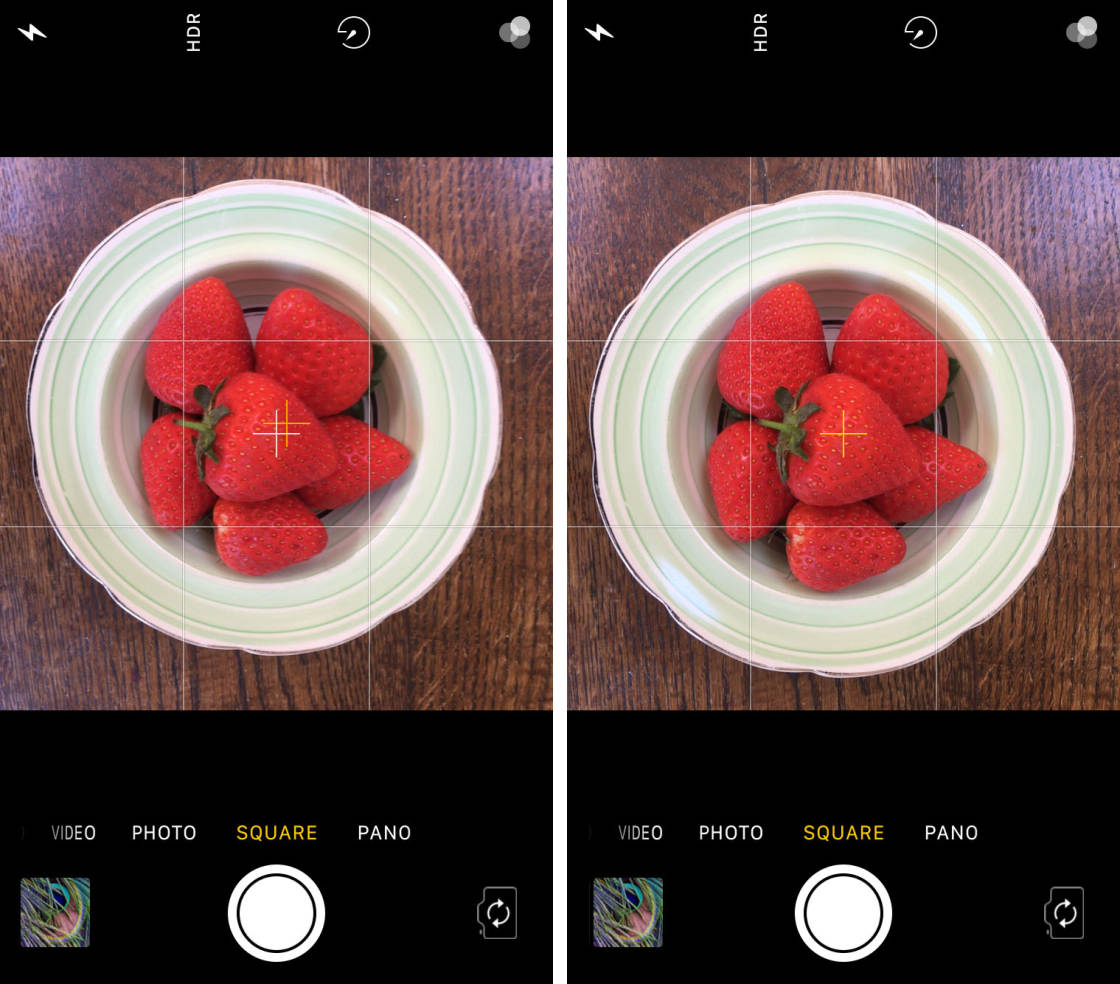
If yous point your iPhone directly up or straight down, you lot'll see a pair of crosshairs in the middle of the screen. These crosshairs will merge into a single yellow cross when the phone is parallel with the ground or ceiling.
3. Set Focus & Exposure For Loftier-Quality Images
Here are two of the most important iPhone camera features to principal:
Focus and exposure.
Making sure your subject field is in sharp focus is actually important. If the subject area appears blurred, your photograph will look like an amateur snapshot.
Exposure refers to the effulgence of your epitome. If it'southward under-exposed (too nighttime) or over-exposed (too bright) it won't look practiced.
So how do you set focus and exposure in the Camera app?
It's actually very easy. Only virtually people don't know well-nigh these hidden iPhone photographic camera features.
To set the focus indicate, tap the expanse on the screen that yous'd like in precipitous focus. This would usually exist your main subject field. When focus is set, you lot'll meet a yellow square indicating the focus point.
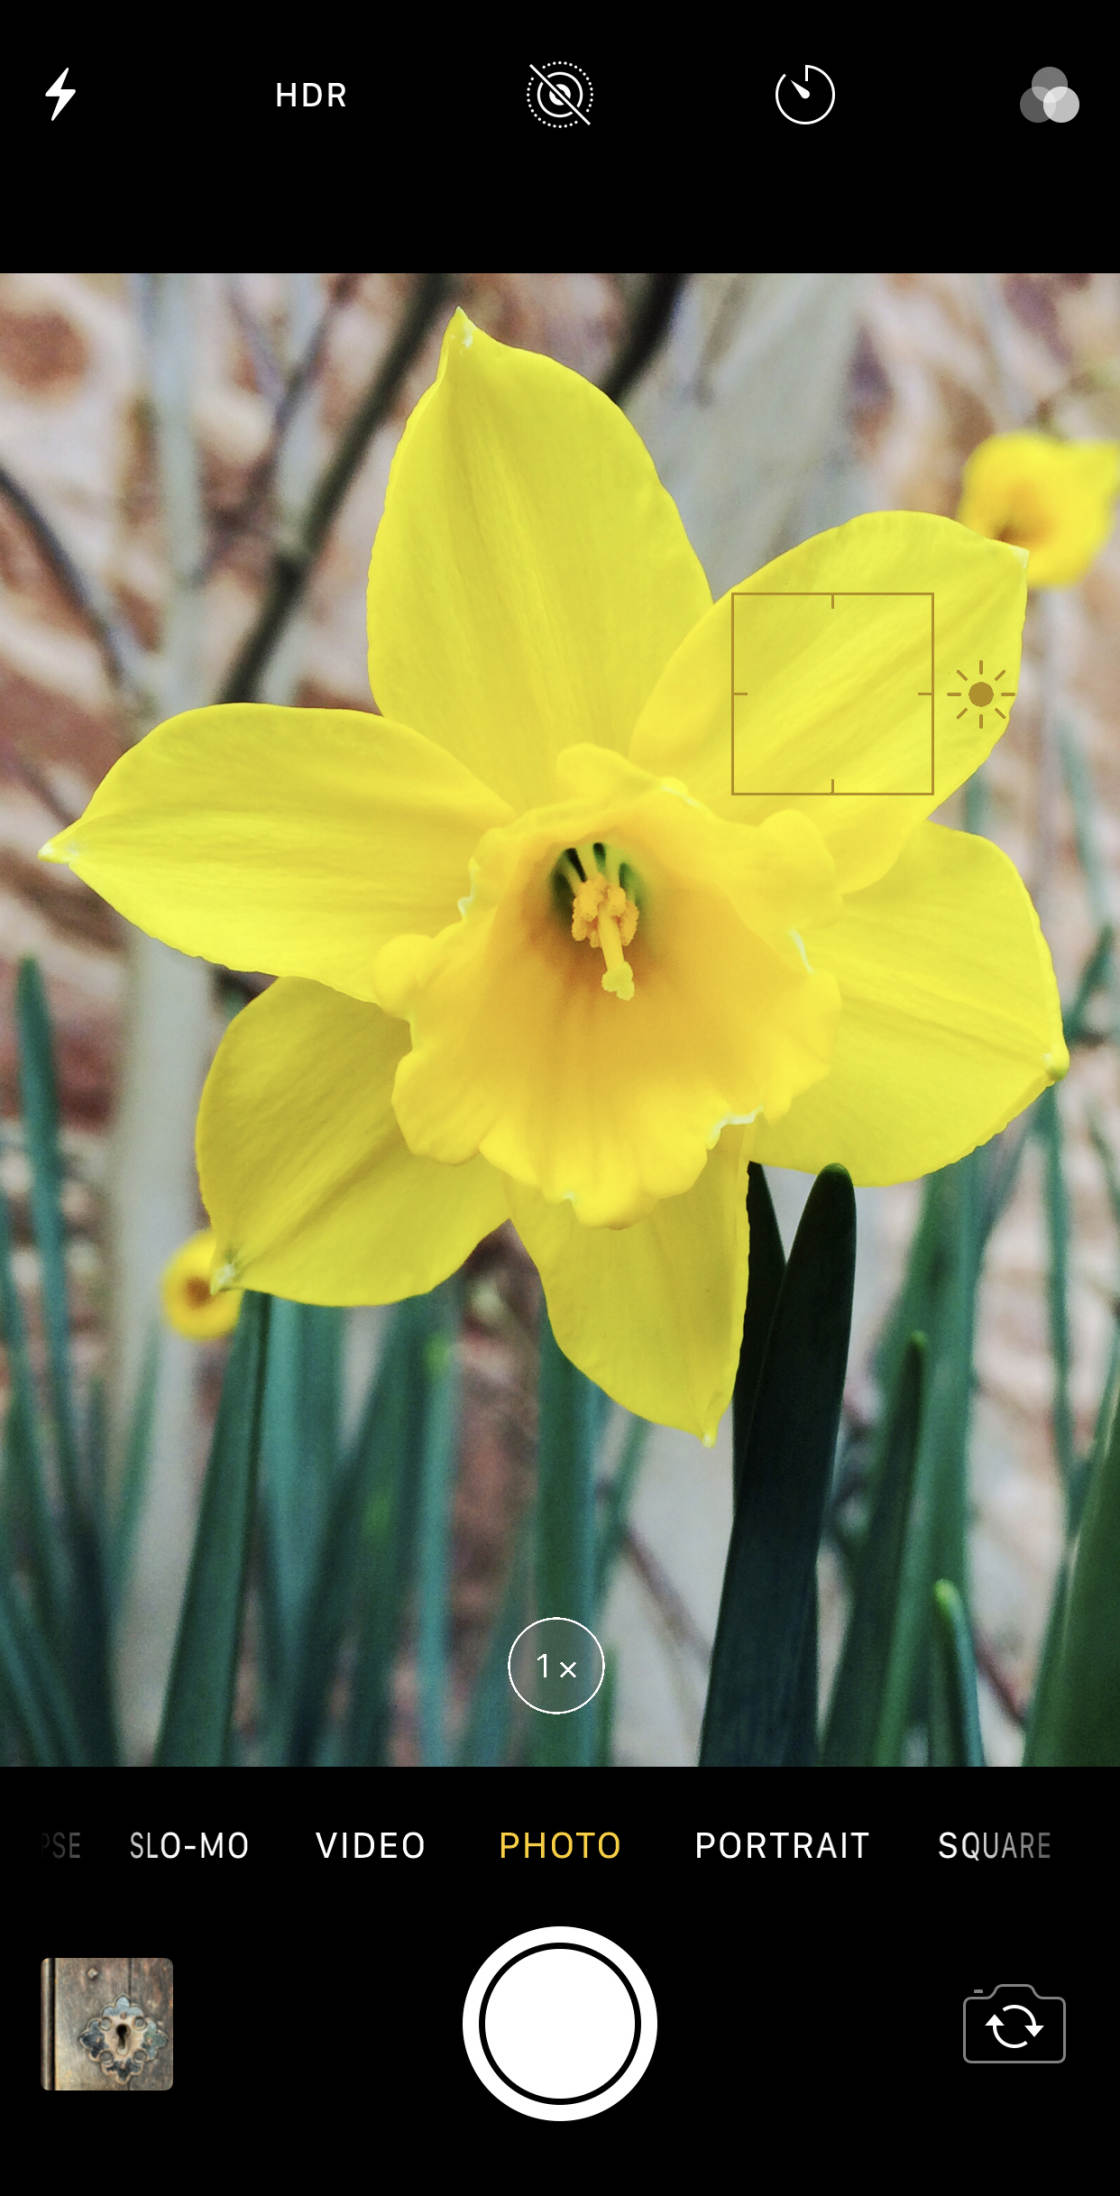
Once yous've fix focus, you tin adjust exposure (brightness) if necessary.
To adjust exposure, swipe upward or downwards on the screen. Swipe upwardly to brand the prototype brighter or down to make it darker.
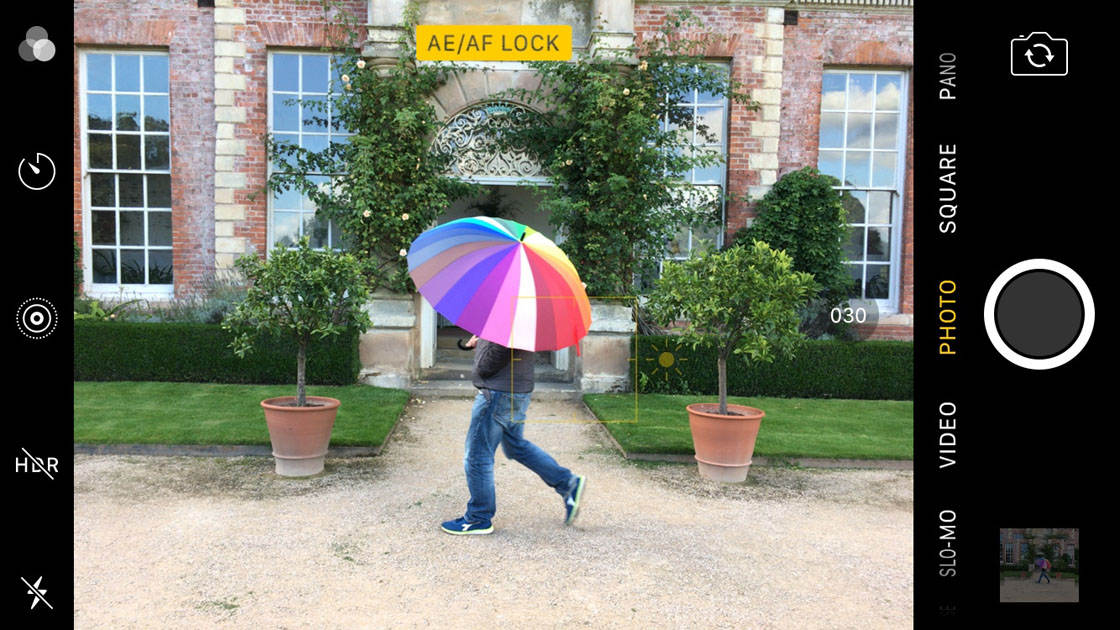
You can also lock the focus and exposure settings using the AE/AF Lock feature.
Tap and hold the screen for a couple of seconds at the point y'all want to focus on. A yellow box with AE/AF LOCK will appear at the summit of the screen.

Now when you have a photo, the camera volition proceed the current focus and exposure settings set up for the next shot.
This is useful for situations where you desire to take several photos of the same scene. It ways yous don't take to gear up focus and exposure for each new shot.
To unlock focus and exposure, tap anywhere on the camera screen.
Knowing how to use iPhone camera features such equally focus and exposure will actually accept your photos to the next level.
iv. Use Outburst Mode For Incredible Activity Shots
Most people only discover burst mode by blow when they press the shutter button for as well long. By holding down the shutter button, you tin can have a burst of many photos in quick succession.
This is one of the best iPhone camera tricks you tin use when photographing moving subjects. It makes information technology easy to capture the perfect action shot as you're bound to get at least ane great photo in the sequence.
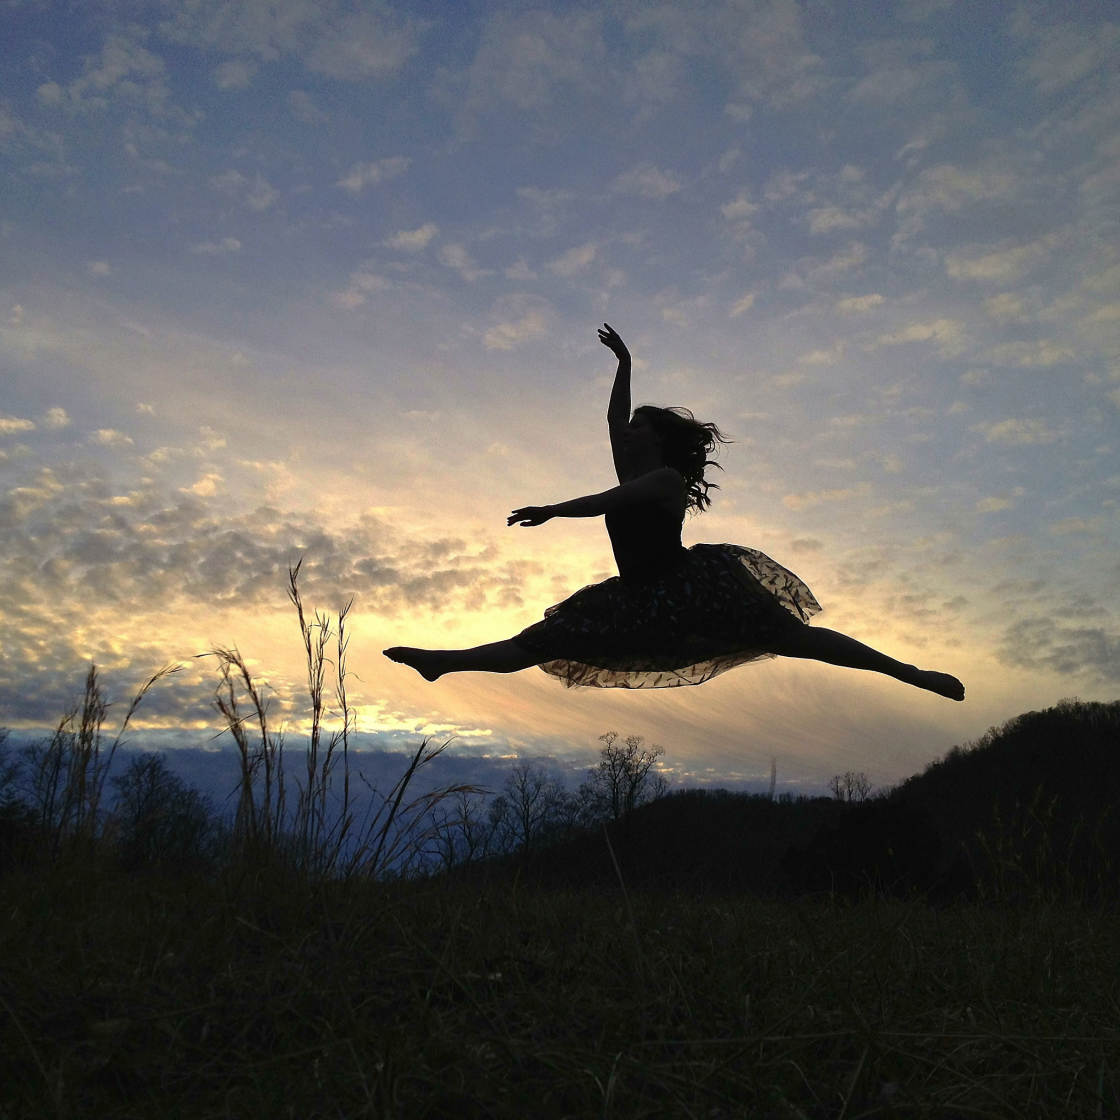
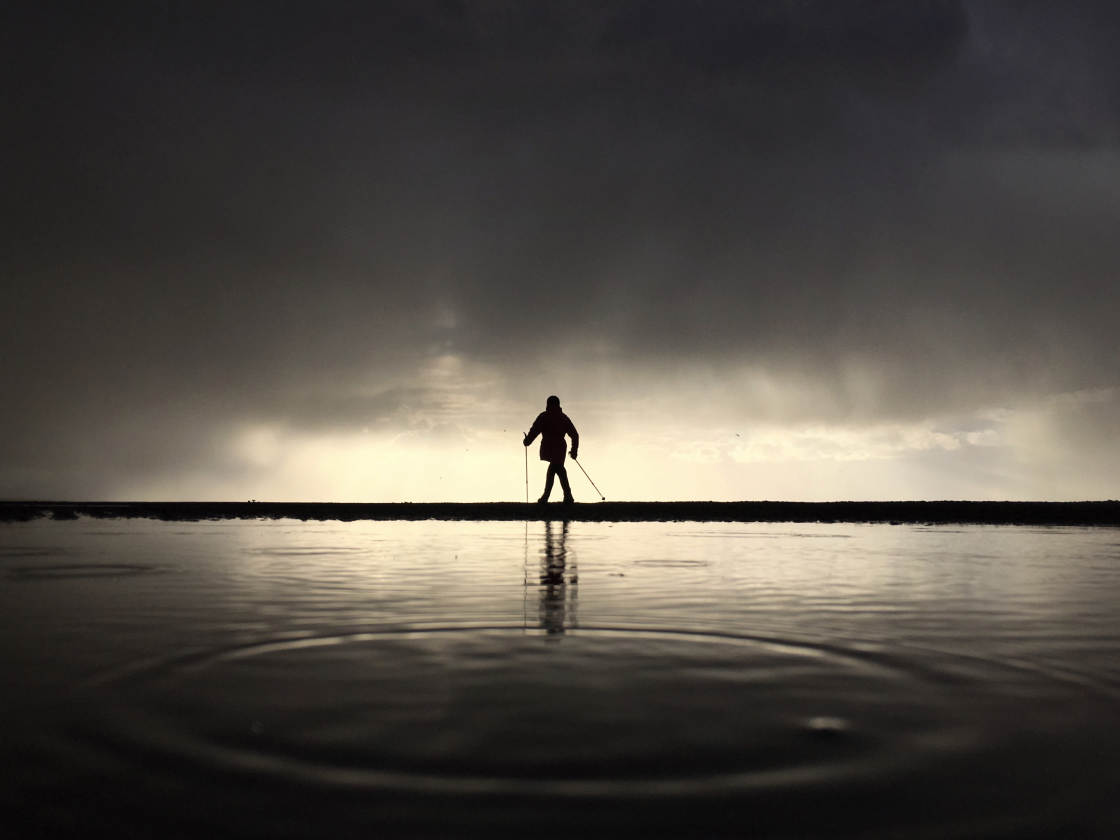
Burst manner is perfect when there's motion or unpredictability in the scene. Utilize it for sports photography, street photography, and action photography.
Use it when photographing children or animals who won't keep nonetheless. And use it to capture stunning water splashes or crashing waves.
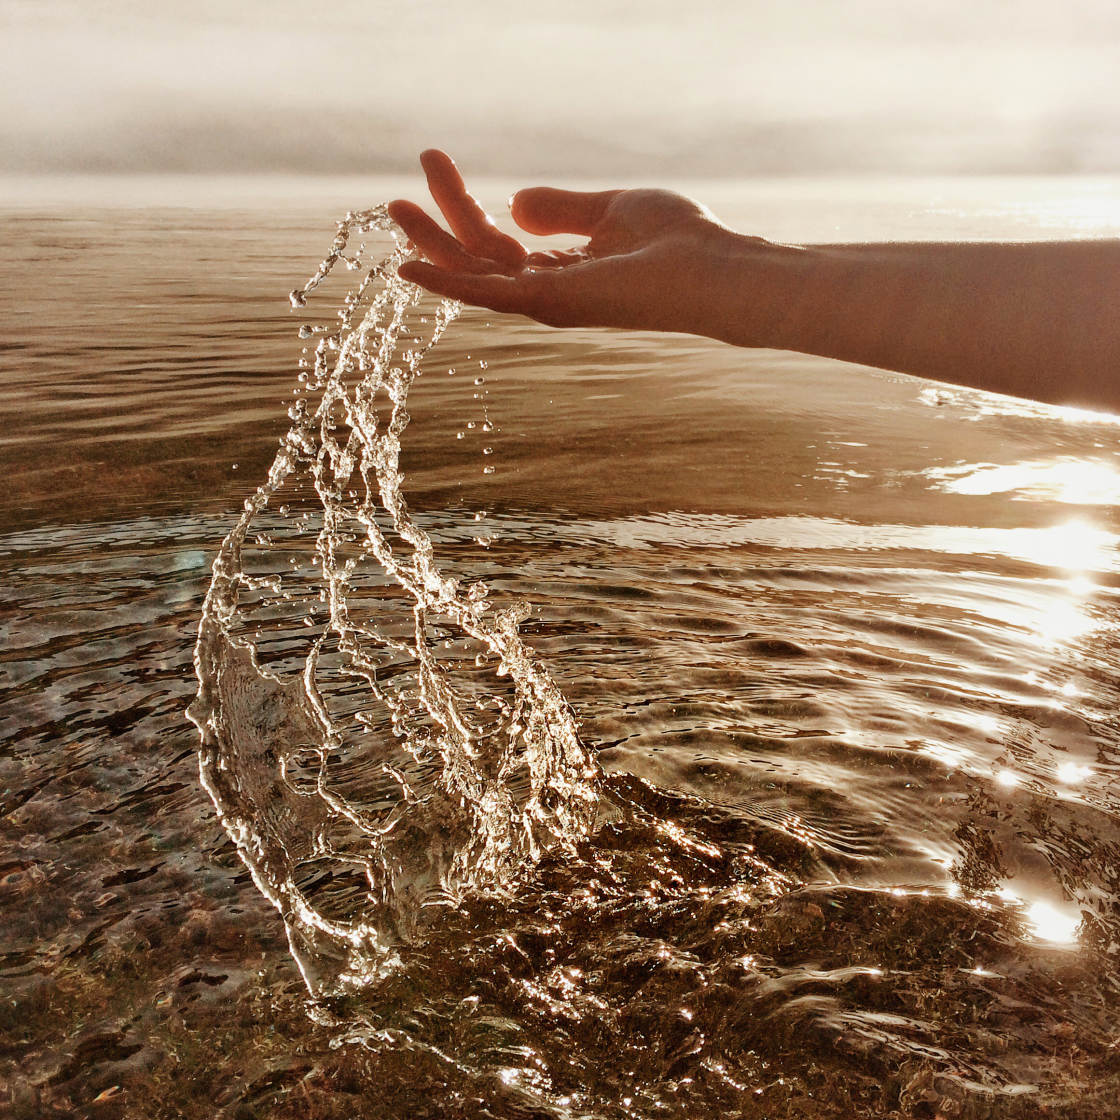
Frame your shot, so hold down the shutter button while the subject field moves through the scene.
Once you've shot a burst of images, you lot can cull the best photos and delete the rest.
To select the photos you lot want to continue, open thePhotosapp and tap on the outburst y'all just shot. And then tapSelect at the lesser of the screen.
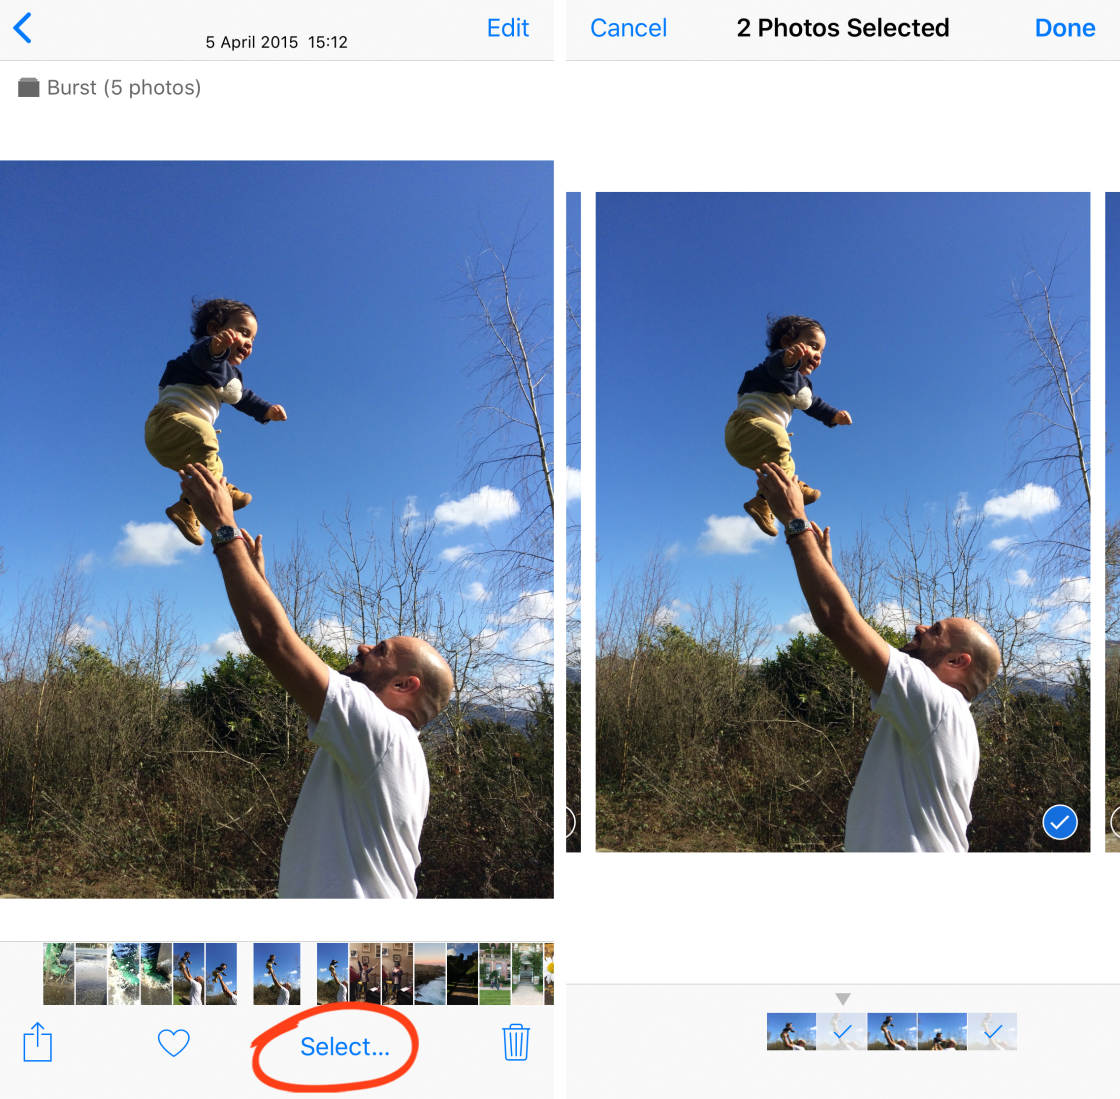
Curl beyond to view all of the images from the burst. Select the photos y'all want to continue, then tapDone.
Remember, burst mode is 1 of the best iPhone camera settings you can employ for photographing moving subjects.
5. Create Stunning Long Exposures With Alive Photos
Did yous know you can take beautiful long exposure photos with the iPhone's built-in Camera app?
The long exposure feature lets you create a boring shutter upshot. This makes any movement appear as motion blur.
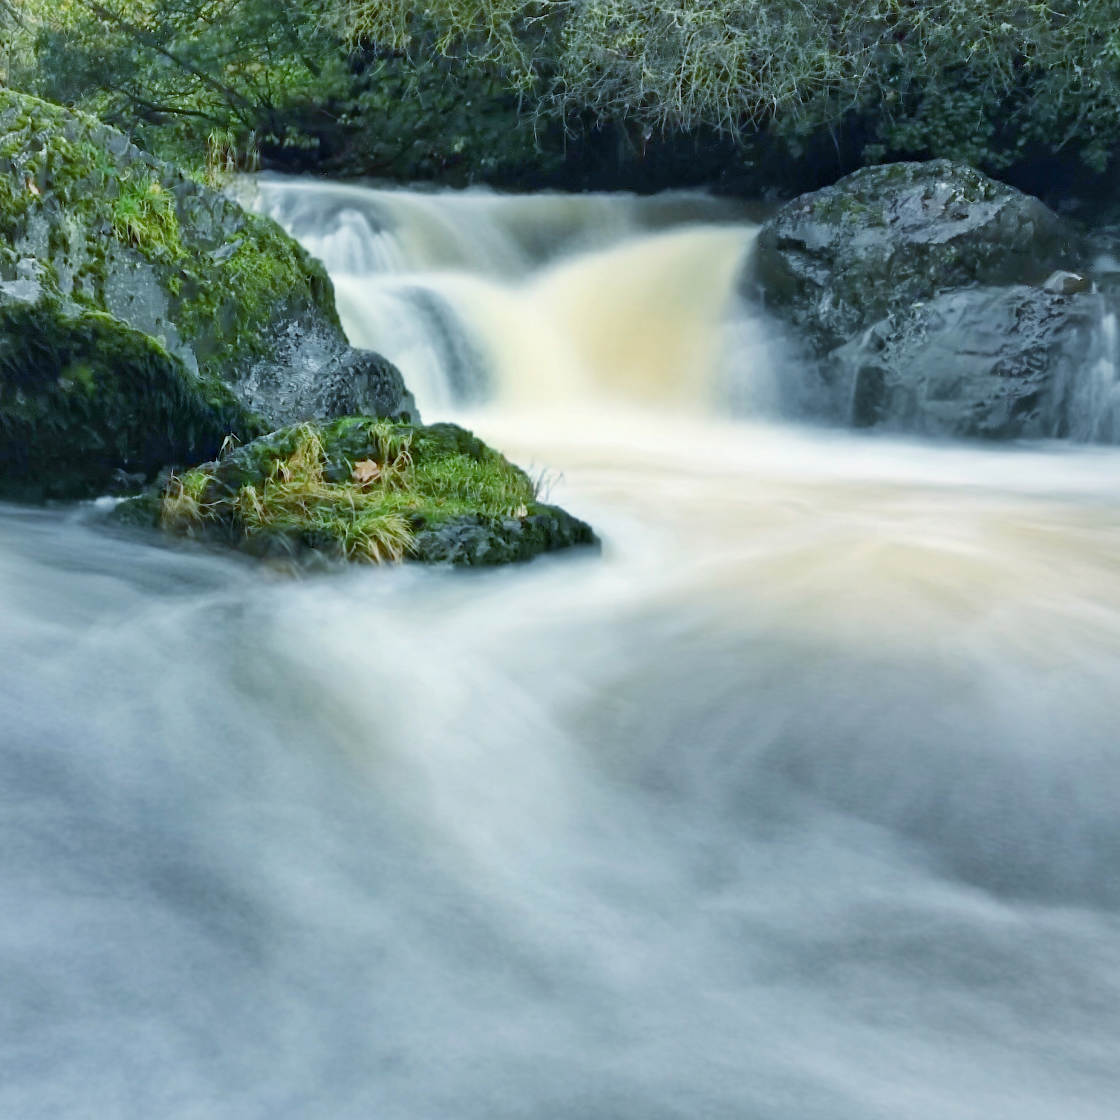
Yous tin can use this setting to create a stunning veiling consequence on waterfalls and rivers. Or use information technology to capture dramatic low-cal trails at night.

And then where is this long exposure setting subconscious?
Y'all'll actually find it within the Live Photos characteristic of the Photographic camera app.
First, y'all'll need to switch on Live Photos using the circles icon at the meridian of the Camera app.
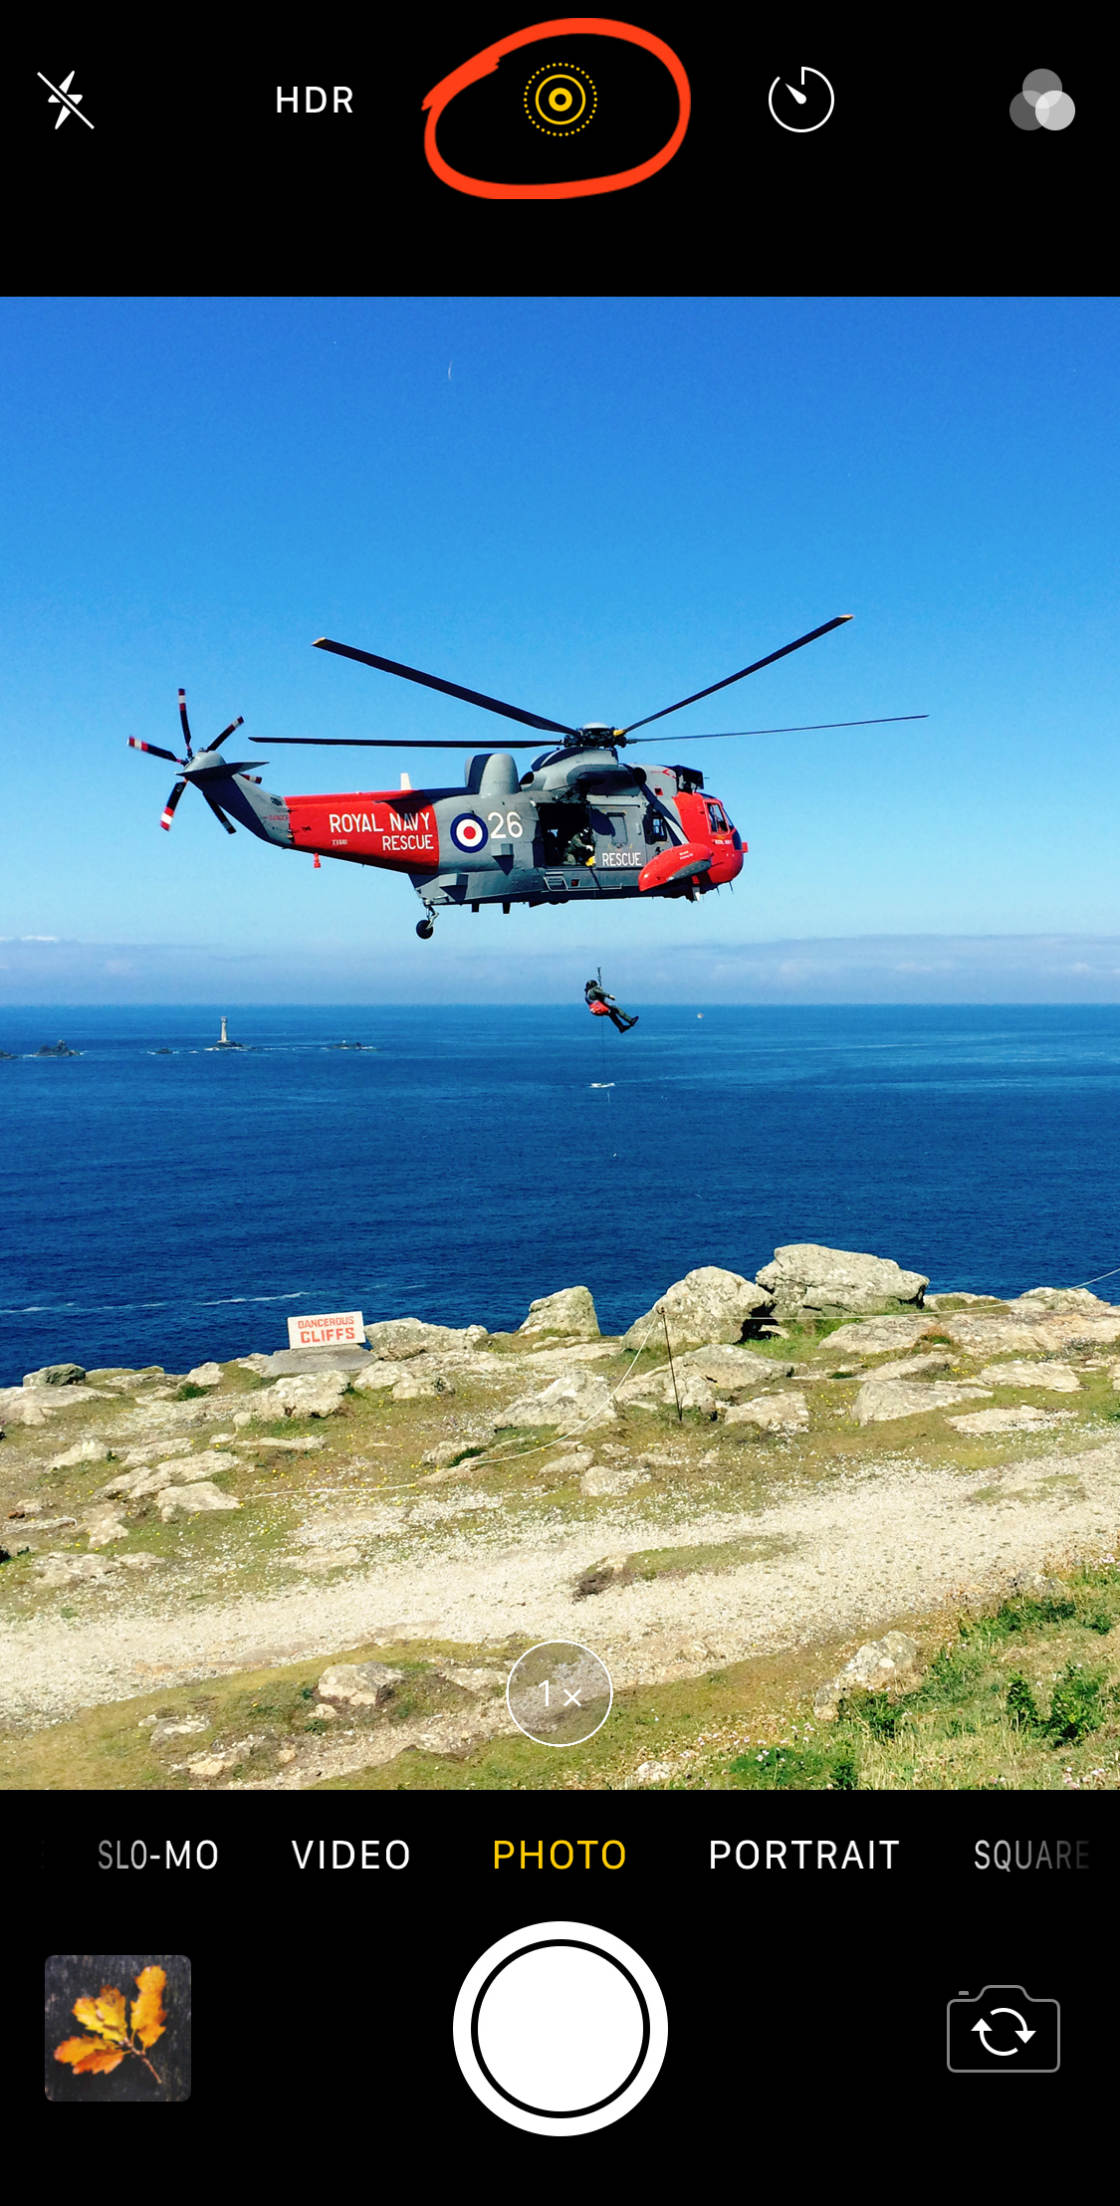
When yous tap the shutter push button, you'll record a iii-second Live Photo complete with movement and sound.
To plough the Alive Photo into a long exposure, swipe up to admission the Live Photograph Effects. Swipe across the effects and select Long Exposure.

Whatsoever movement in your Live Photo volition appear as motion mistiness, while stationary objects remain sharp.
If you change your mind, you tin can remove the long exposure outcome by selecting Live in the Effects section.
half dozen. Capture Beautifully Blurred Backgrounds With Portrait Fashion
Practise you want to know how to blur background on iPhone camera?
Creating a shallow depth of field is typically simply possible with DSLR cameras.
Only with many of the newer iPhone models, you can apply Portrait fashion to create a shallow depth of field outcome.
Portrait manner is available on the iPhone 11, iPhone eleven Pro, iPhone 11 Pro Max. You lot'll also find information technology on the iPhone XS, iPhone XS Max, iPhone XR. iPhone X, iPhone 8 Plus, and iPhone vii Plus.
And then, how do you use Portrait mode?
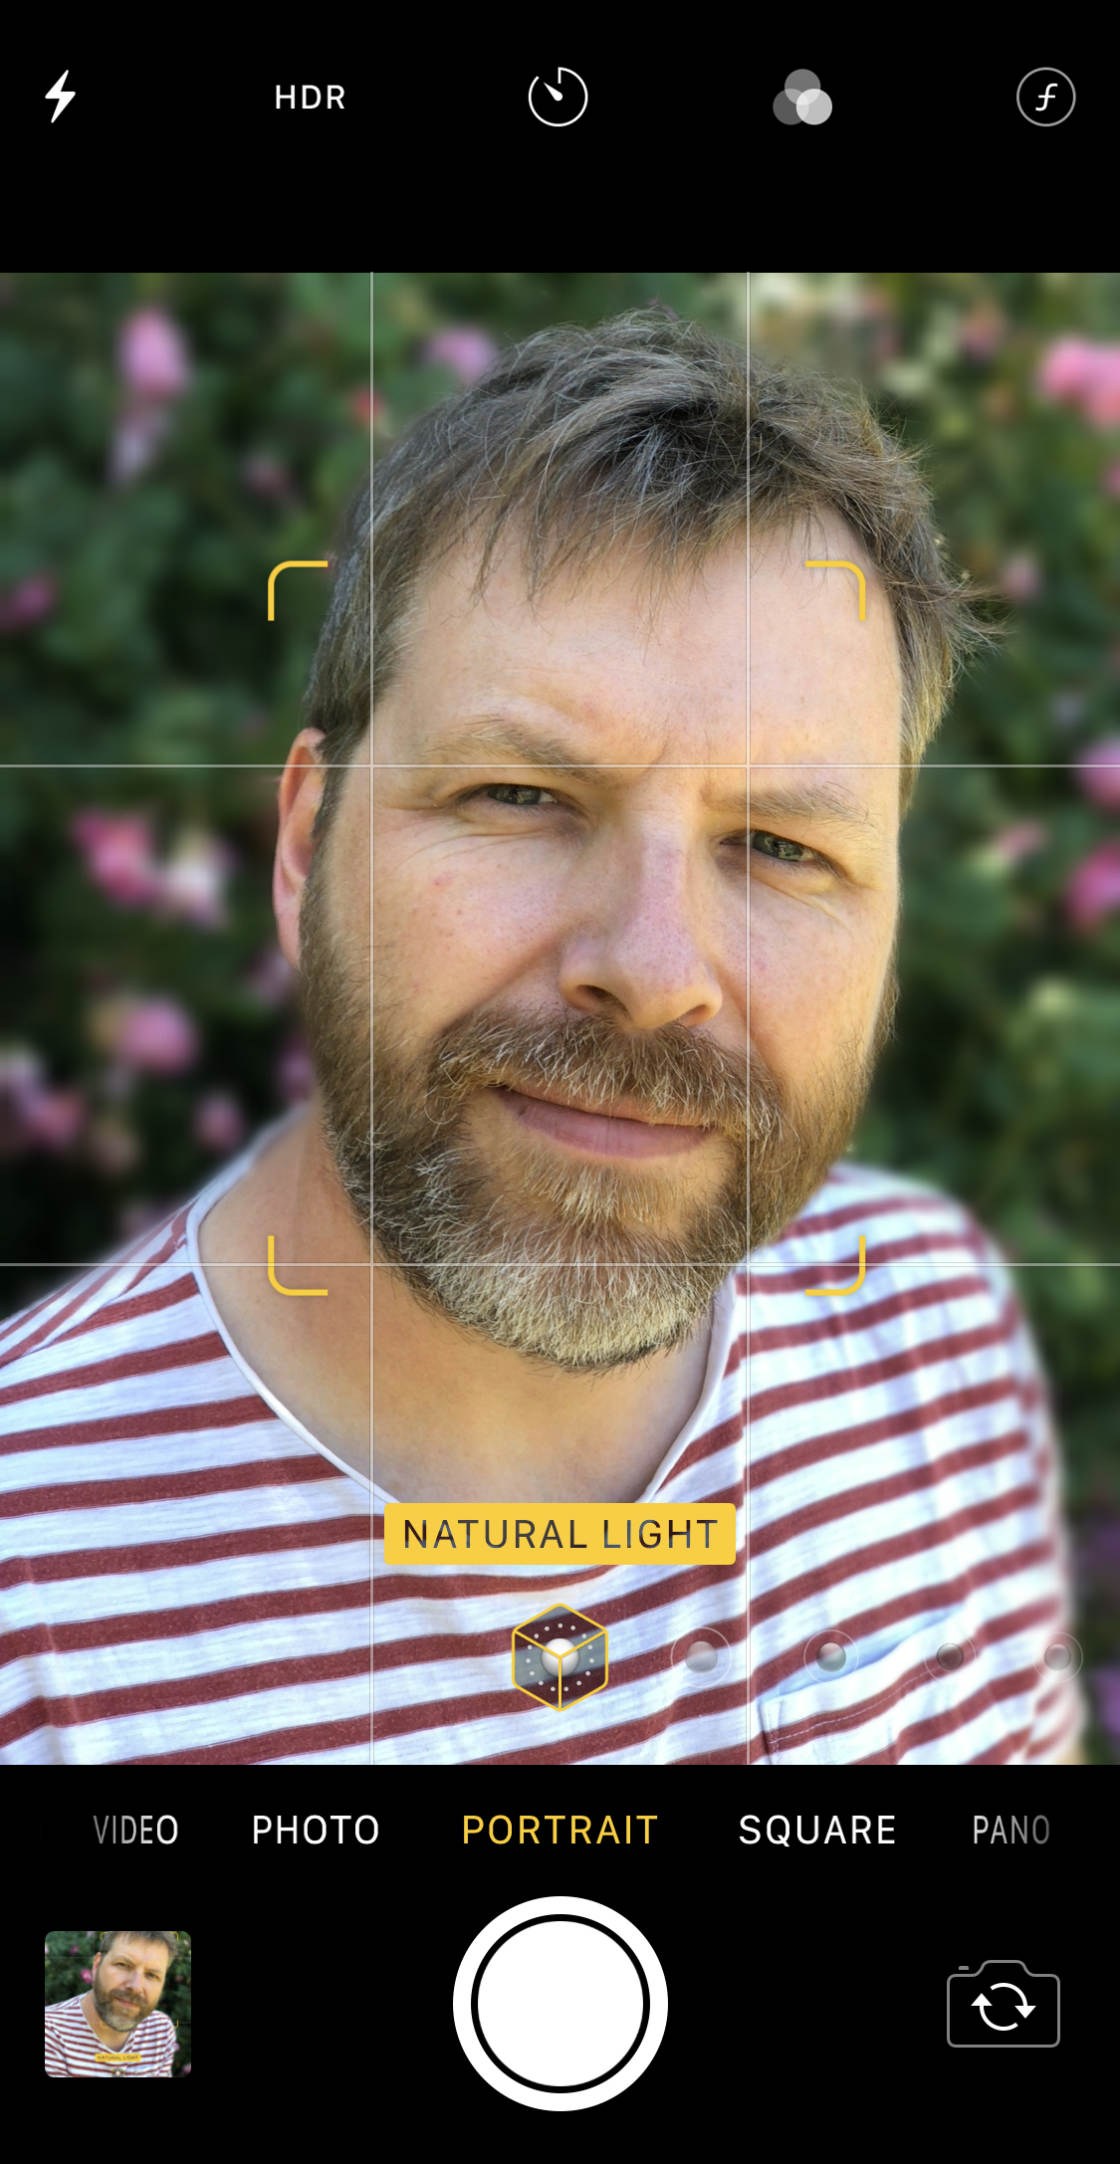
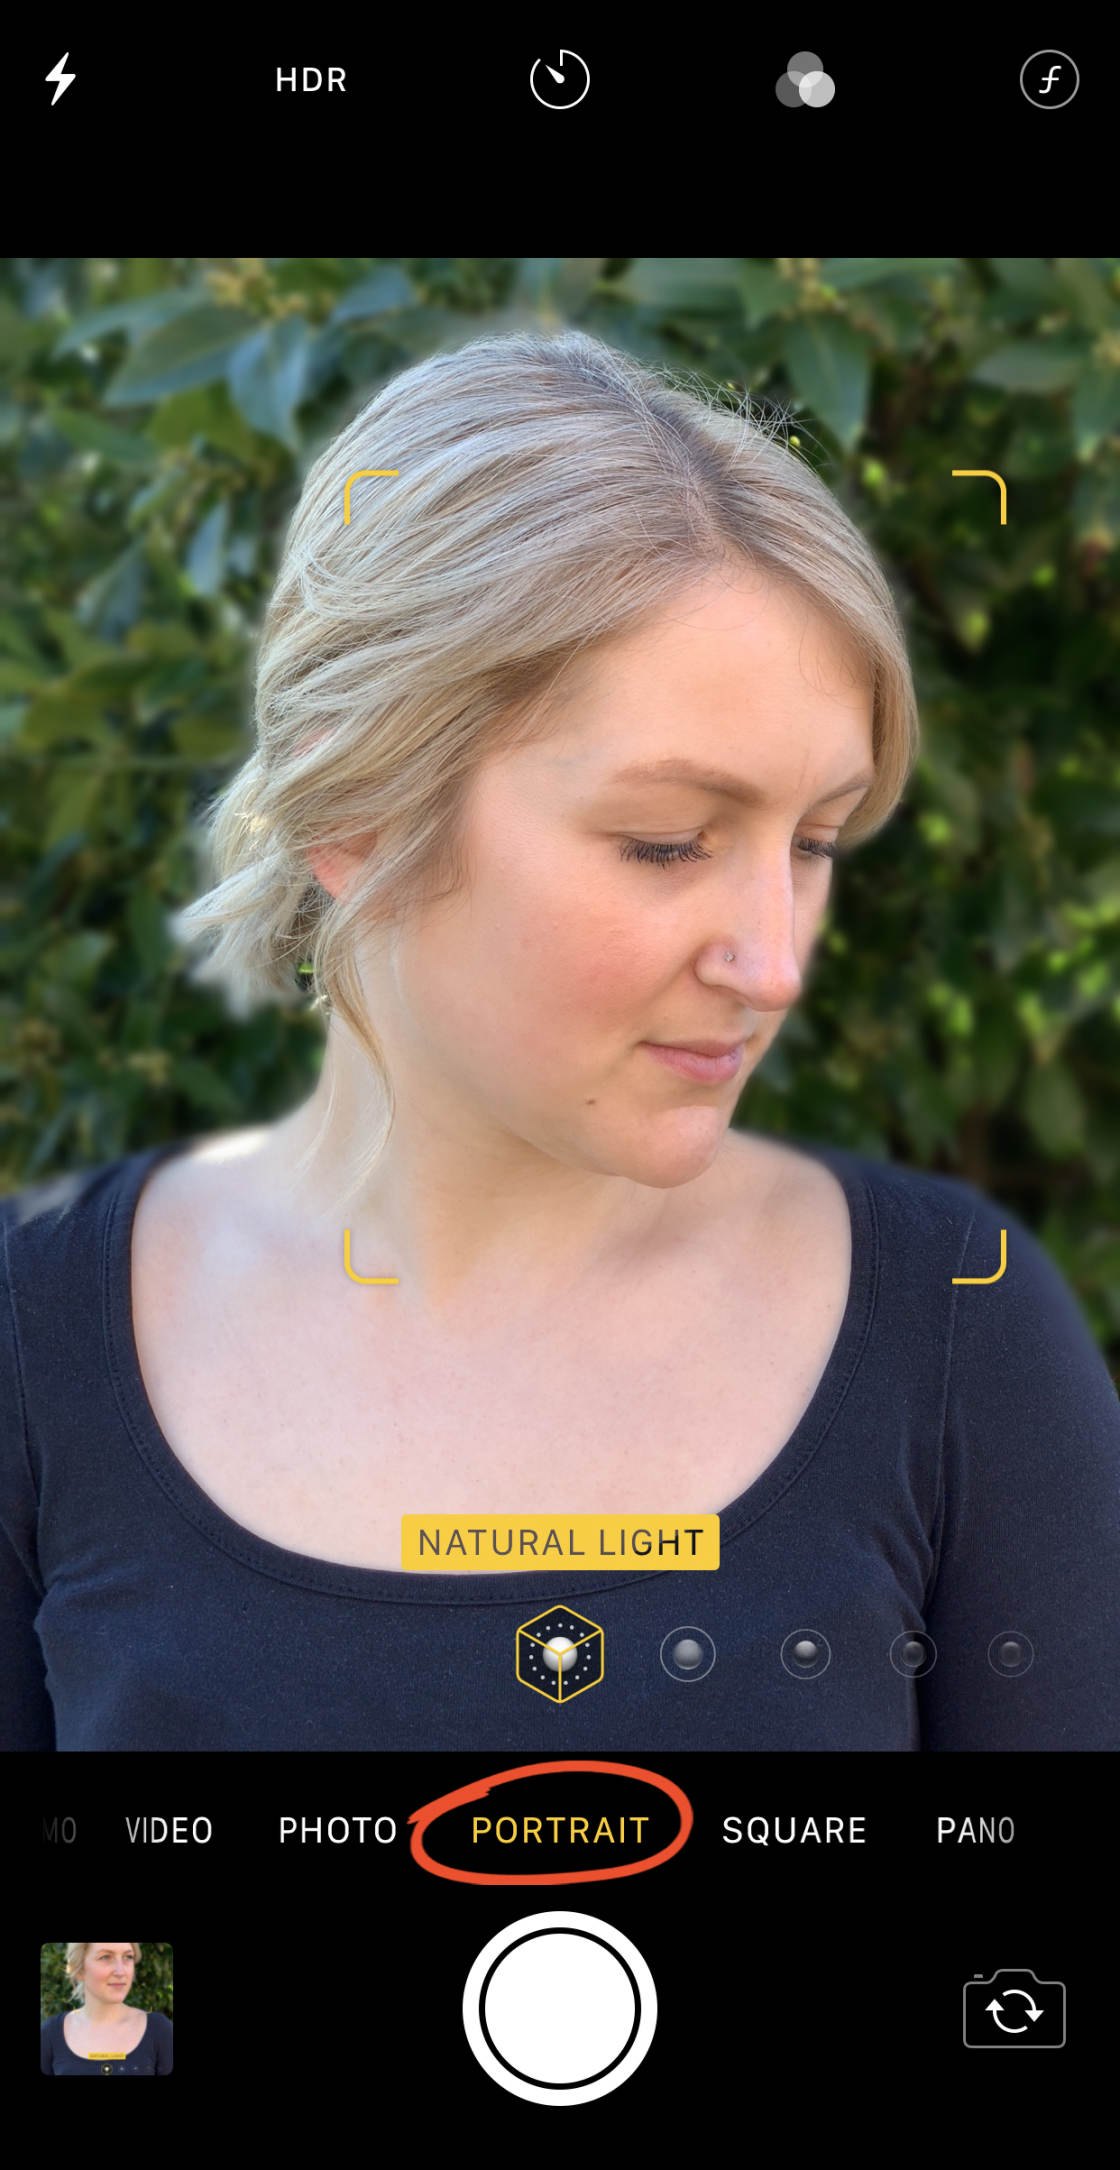
Open the Camera app, then select P ortrait at the bottom of the screen.
Ensure your subject is between two and eight anxiety from the photographic camera. Portrait mode won't work if the subject area is too close or as well far away.
When Portrait mode is set, you'll see the wordsNatural Light in yellowish. (On the iPhone 7 Plus, you lot'll seeDepth Outcome instead.)
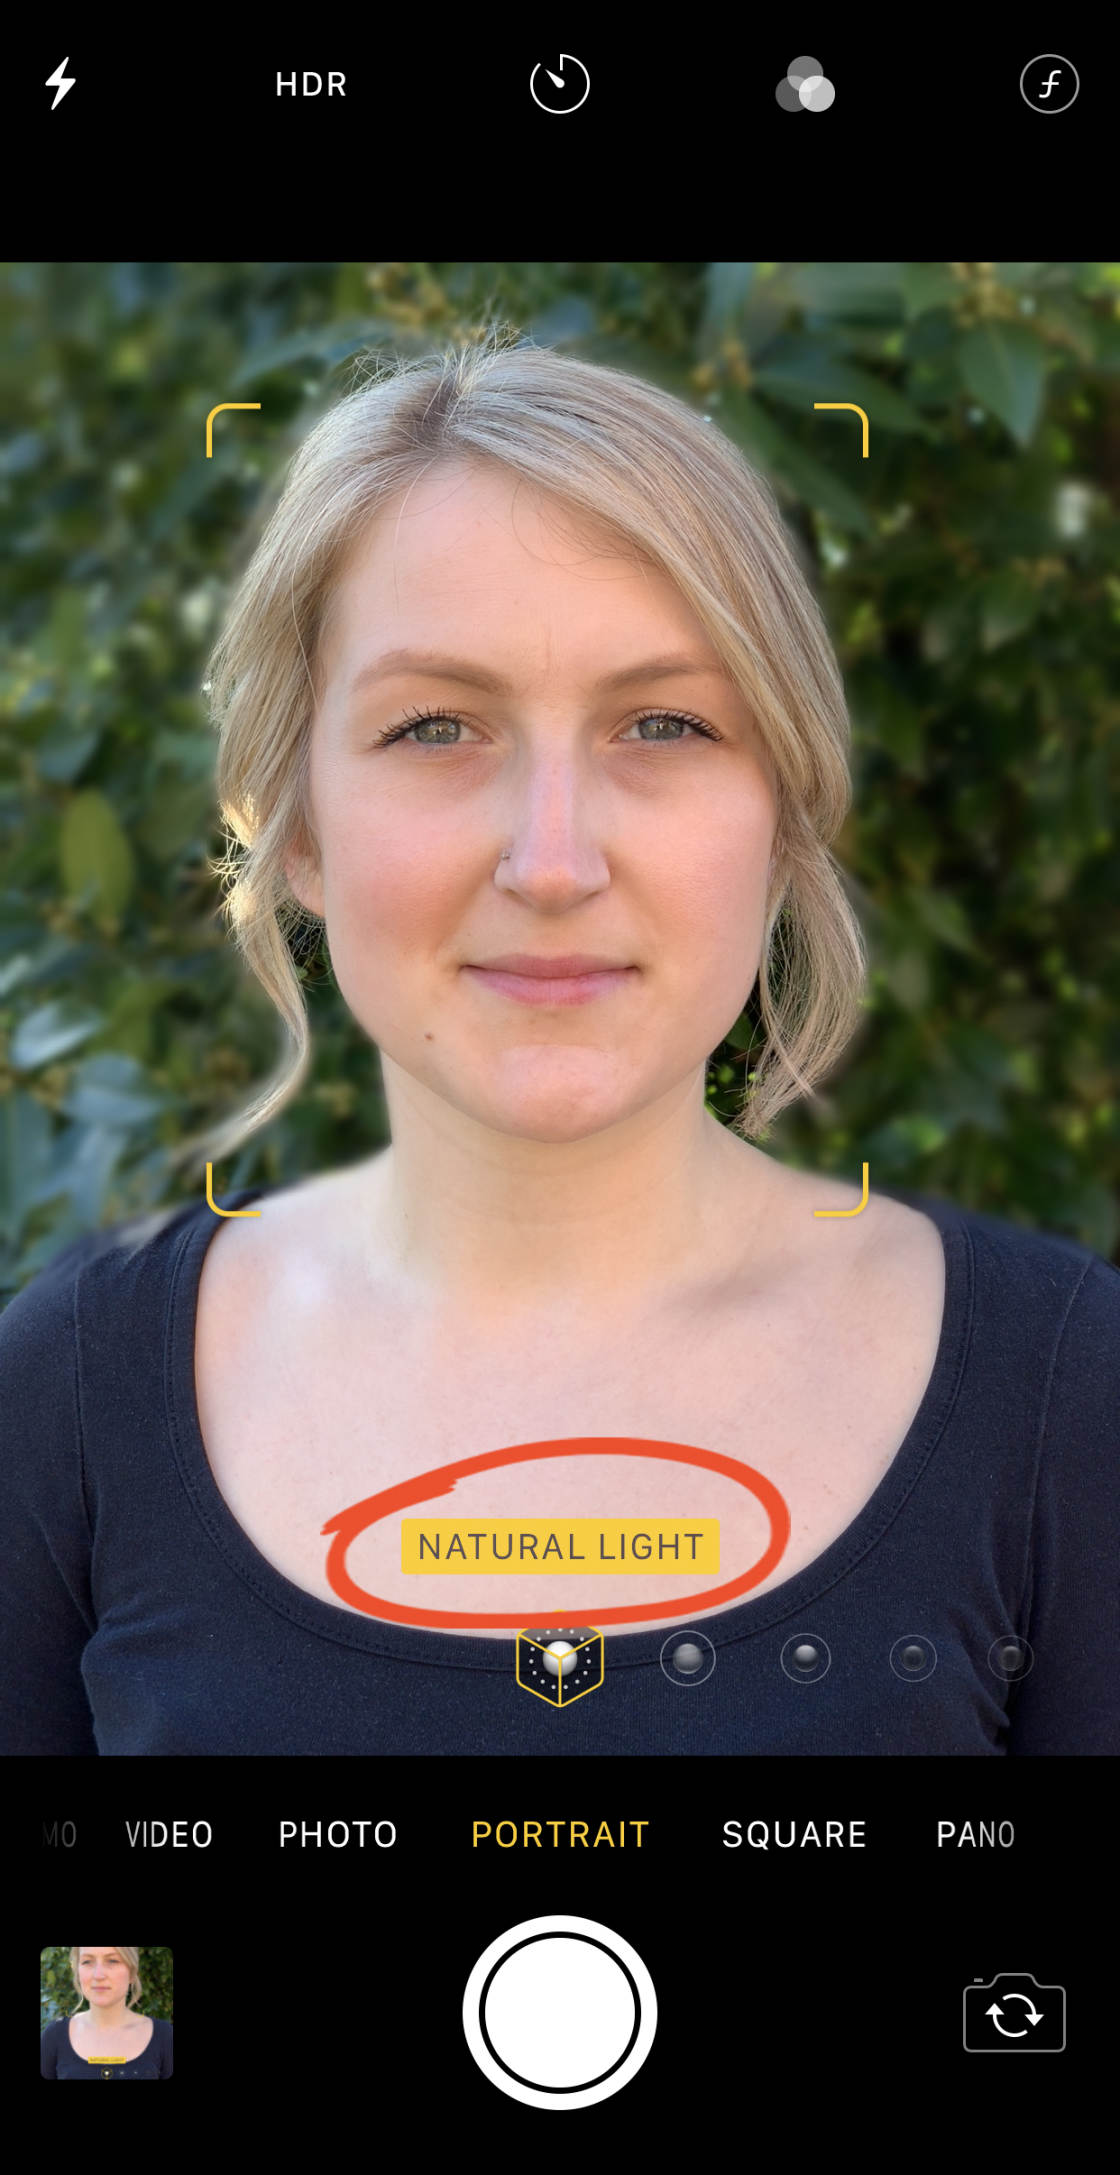
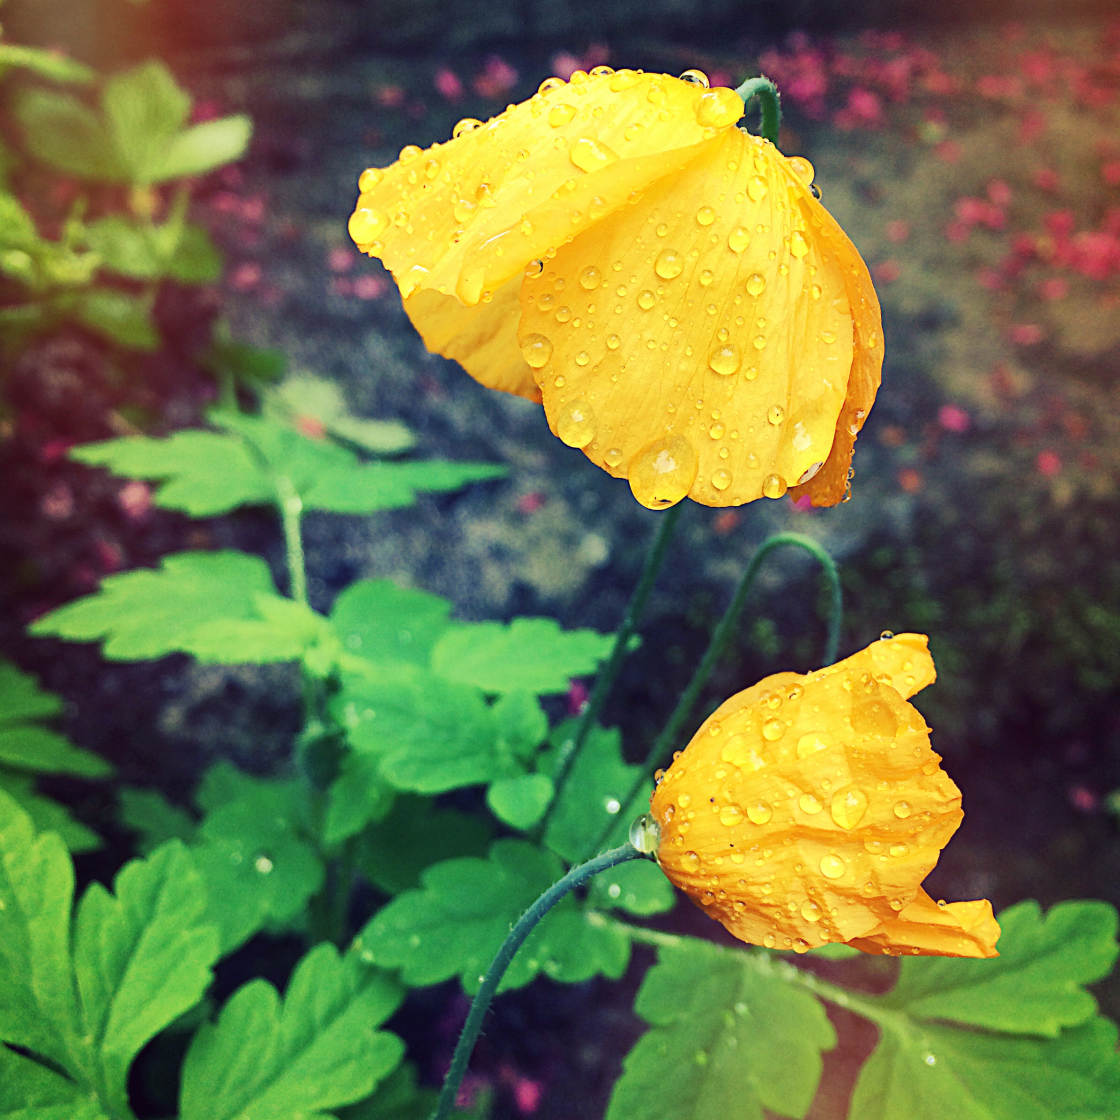
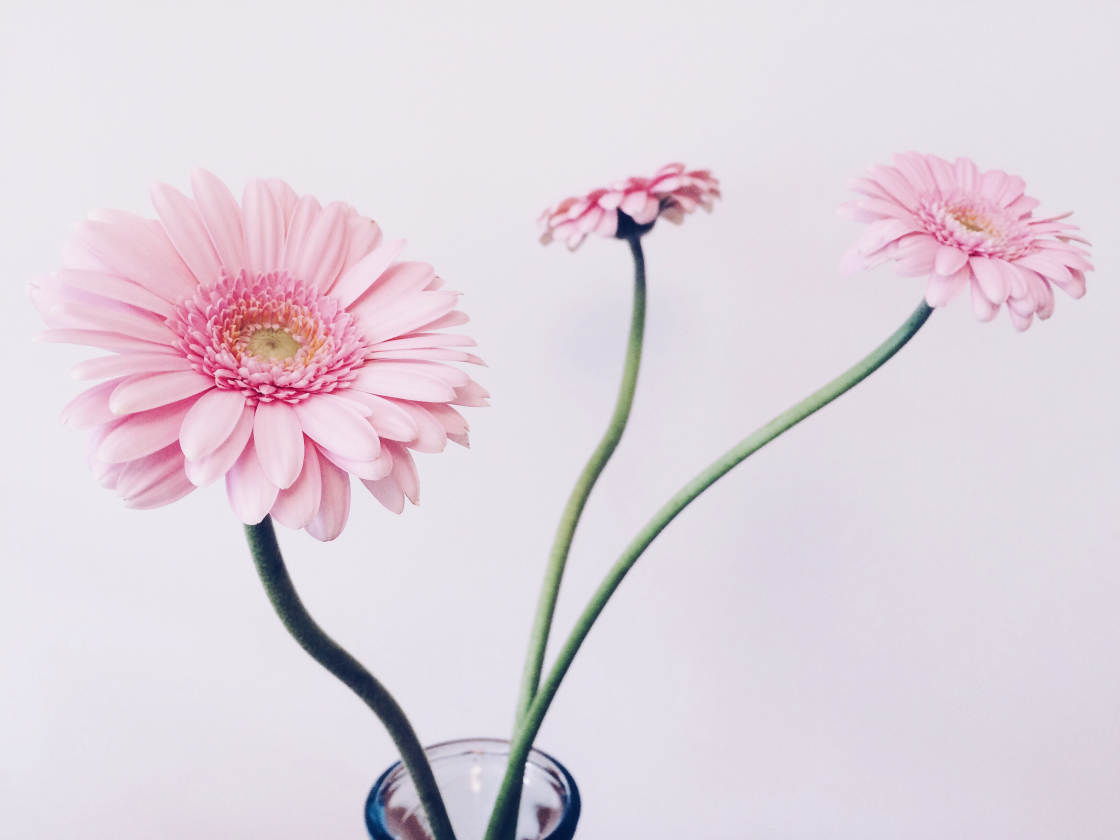
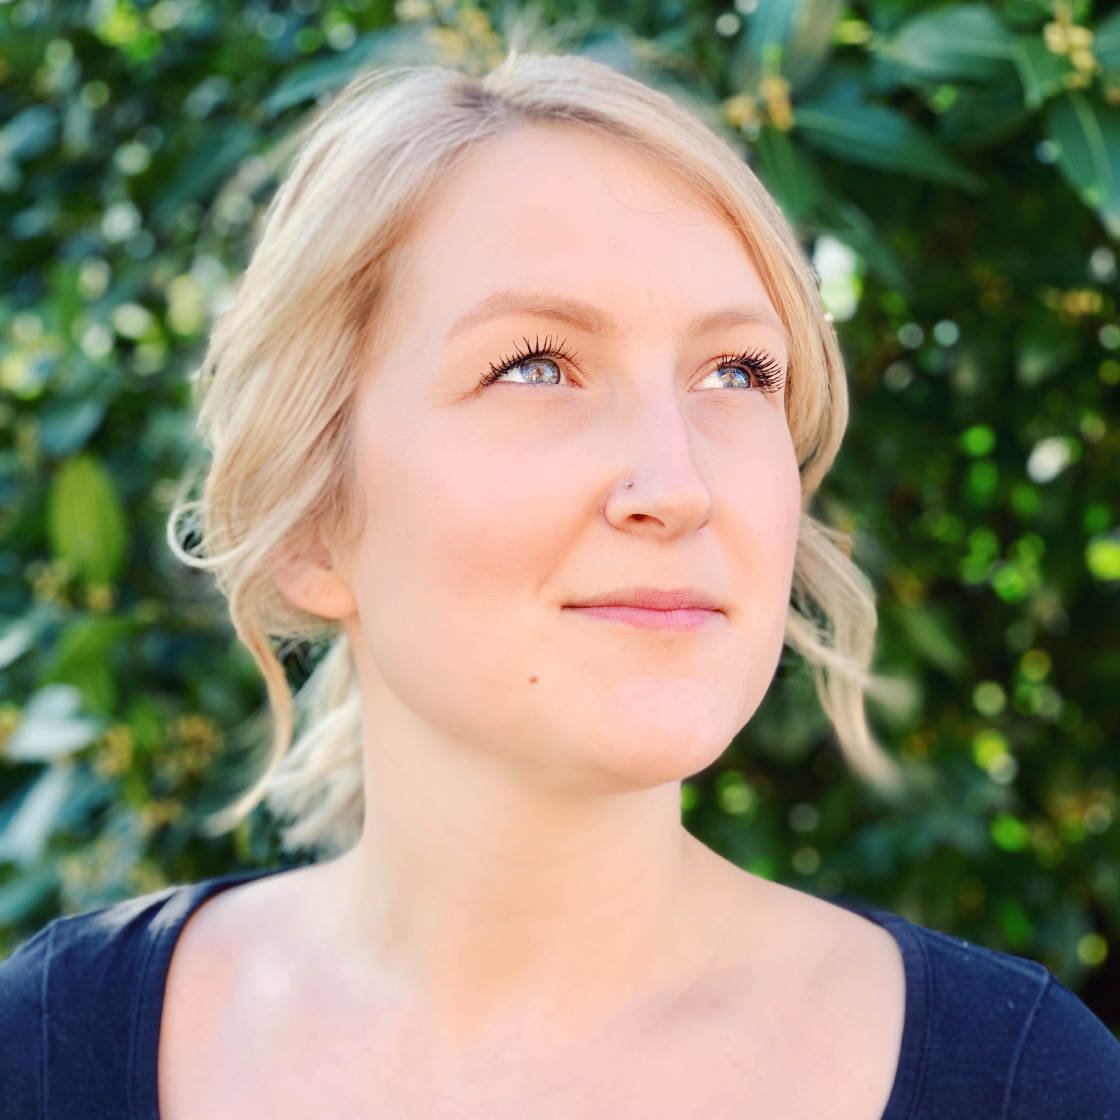
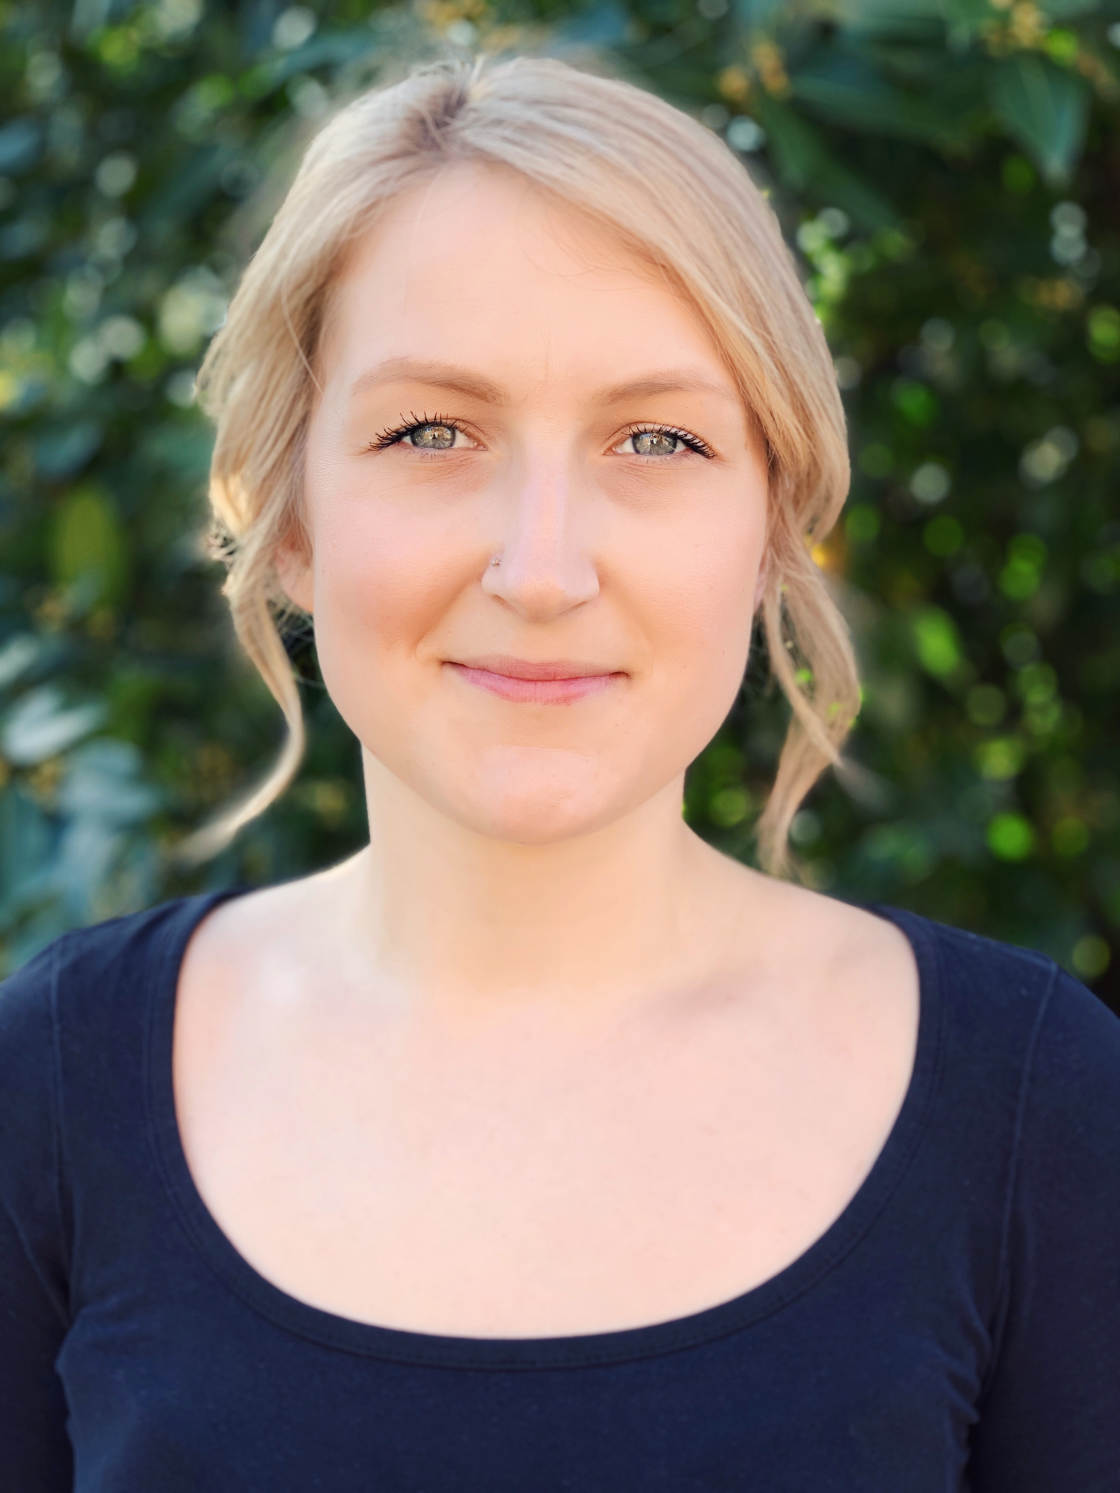
When you accept the photo, your subject will appear sharp against a beautifully blurred background.
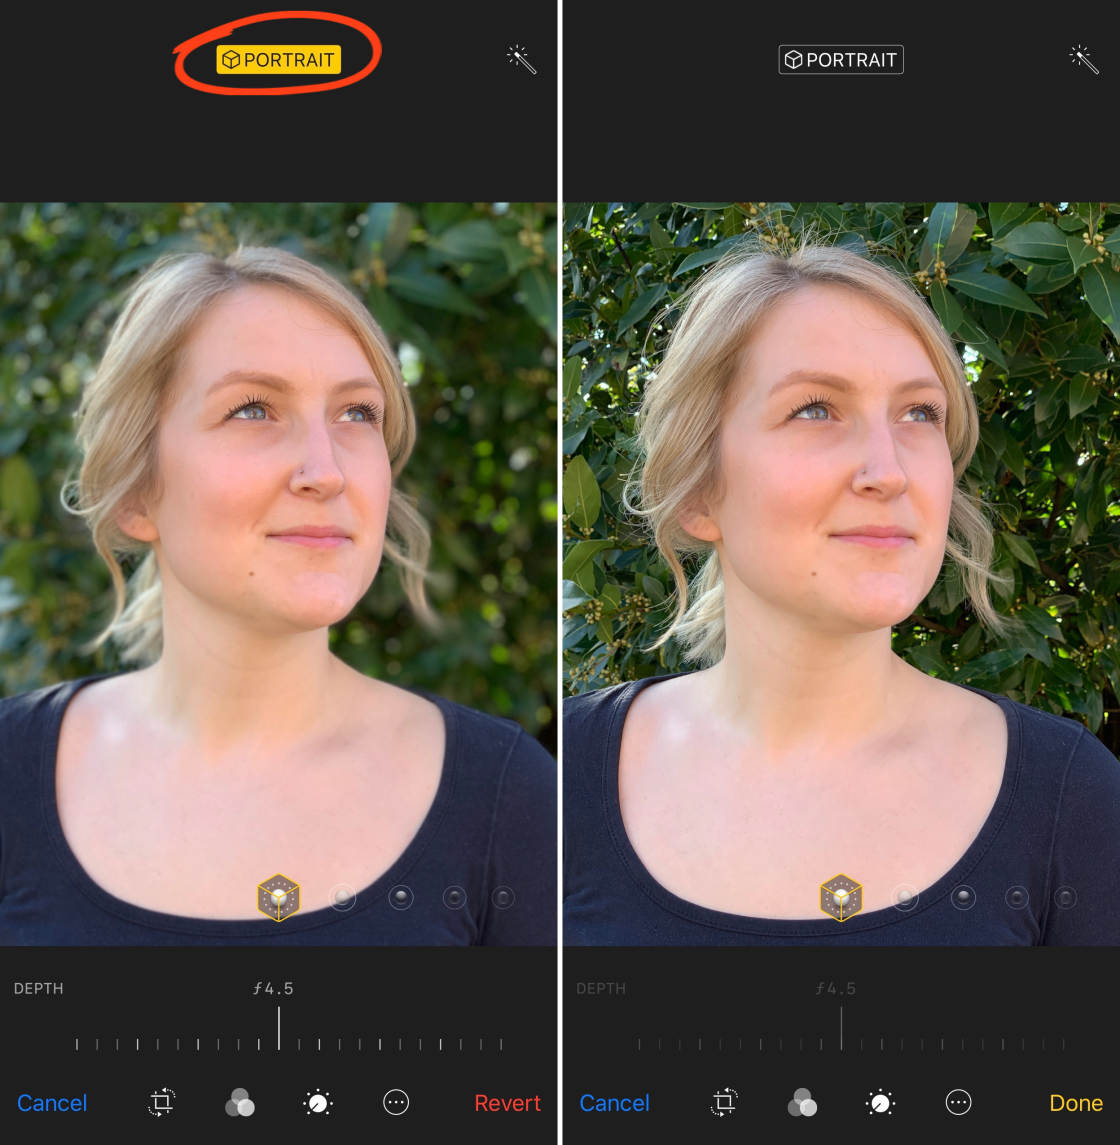
Do you have i of the latest iPhones (XS, XS Max, or XR)? If so, you lot can modify the forcefulness of the background blur… after taking your shot.
Only open your portrait photograph in thePhotos app, and tapEdit at the meridian right.
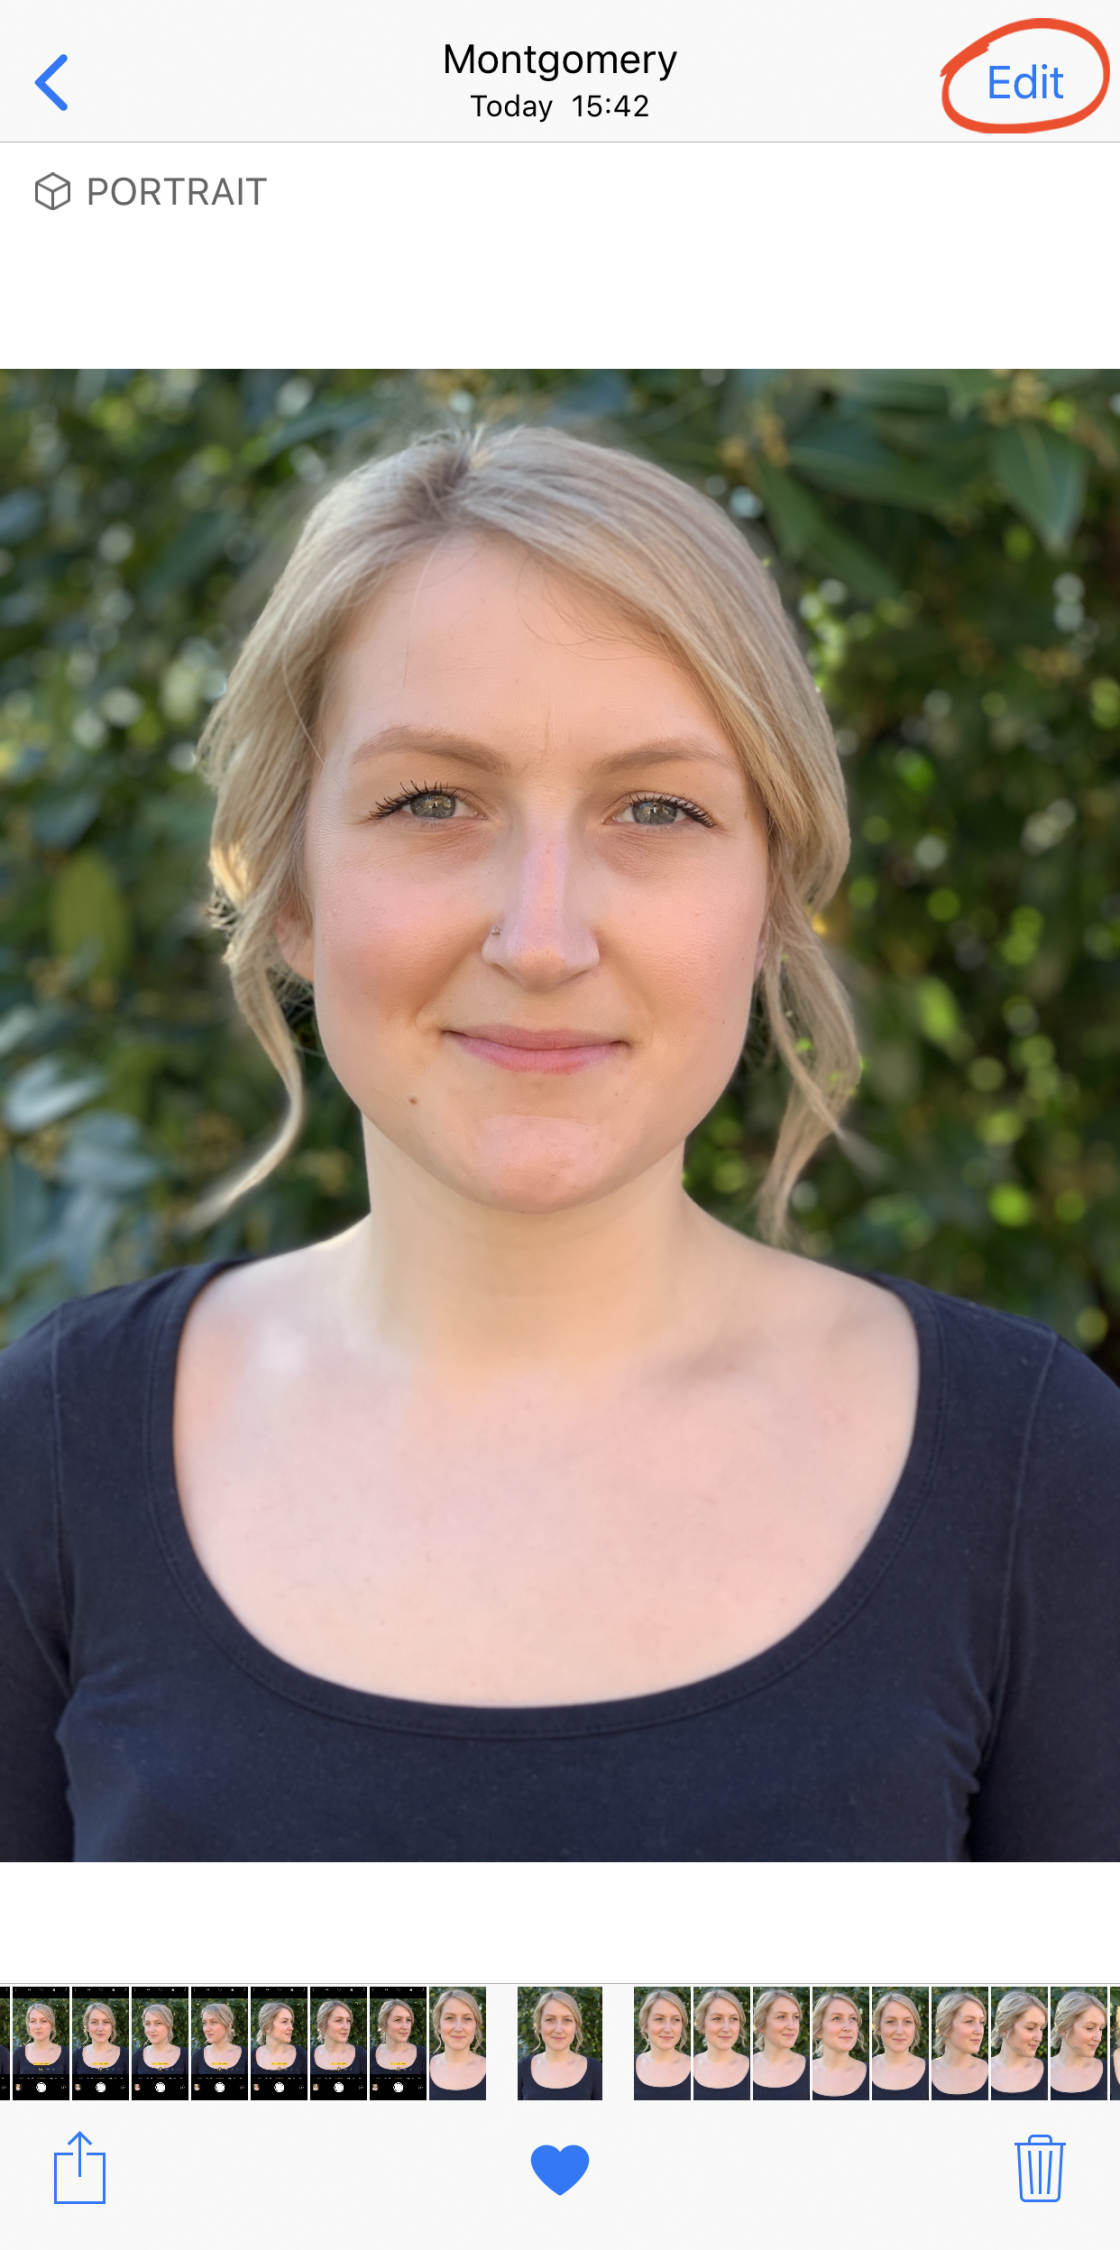
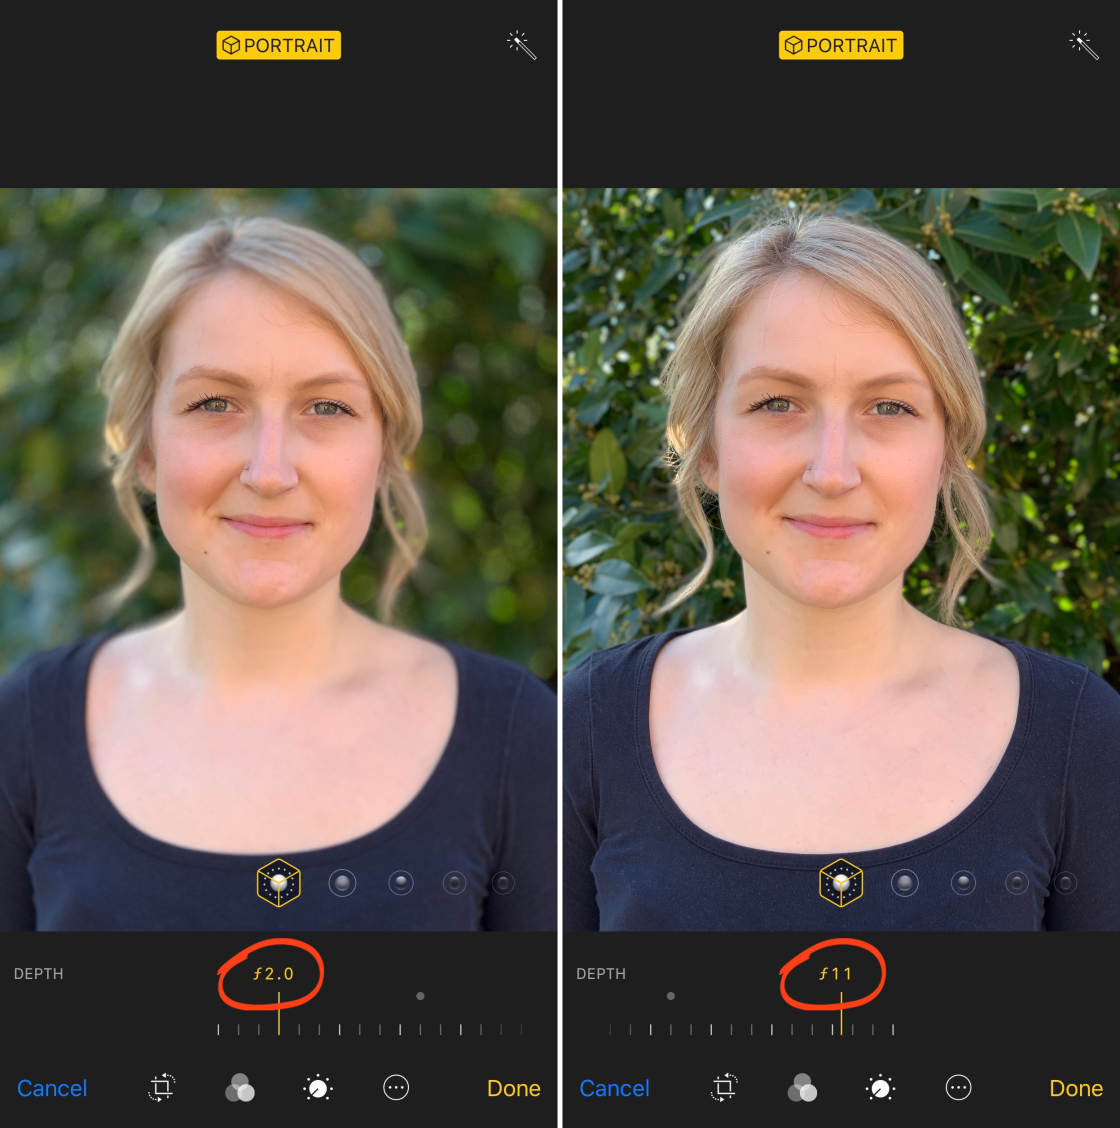
And so utilise theDepth slider beneath the photo to adjust the background mistiness. The lower the f/number, the blurrier the background becomes.
If yous're not happy with the blur issue, yous tin can ever convert the photo to a regular prototype without a blurred groundwork.
To remove the blur, open the photo and tap Edit. Then tap Portrait at the top of the screen. To switch the mistiness back on, tap Portrait again.
When you've finished editing your portrait photo, tapDone to save the changes.
Every bit you can meet, Portrait mode is a fantastic photography tool for creating cute groundwork blur.
It'southward perfect for shooting portrait photos of people and pets. But y'all tin utilise it blur the background backside any kind of bailiwick.
vii. Apply HDR To Capture More Color & Detail In Your Photos
HDR stands for High Dynamic Range. And it's 1 of the best iPhone camera features for creating perfect exposures in tricky low-cal weather.

HDR lets you capture more color and detail in both the dark and bright areas of your photo. It'southward perfect for high dissimilarity scenes, such every bit a mural with a bright heaven and dark foreground.
Without HDR, the heaven is probable to exist over-exposed. Or the foreground might be nether-exposed.
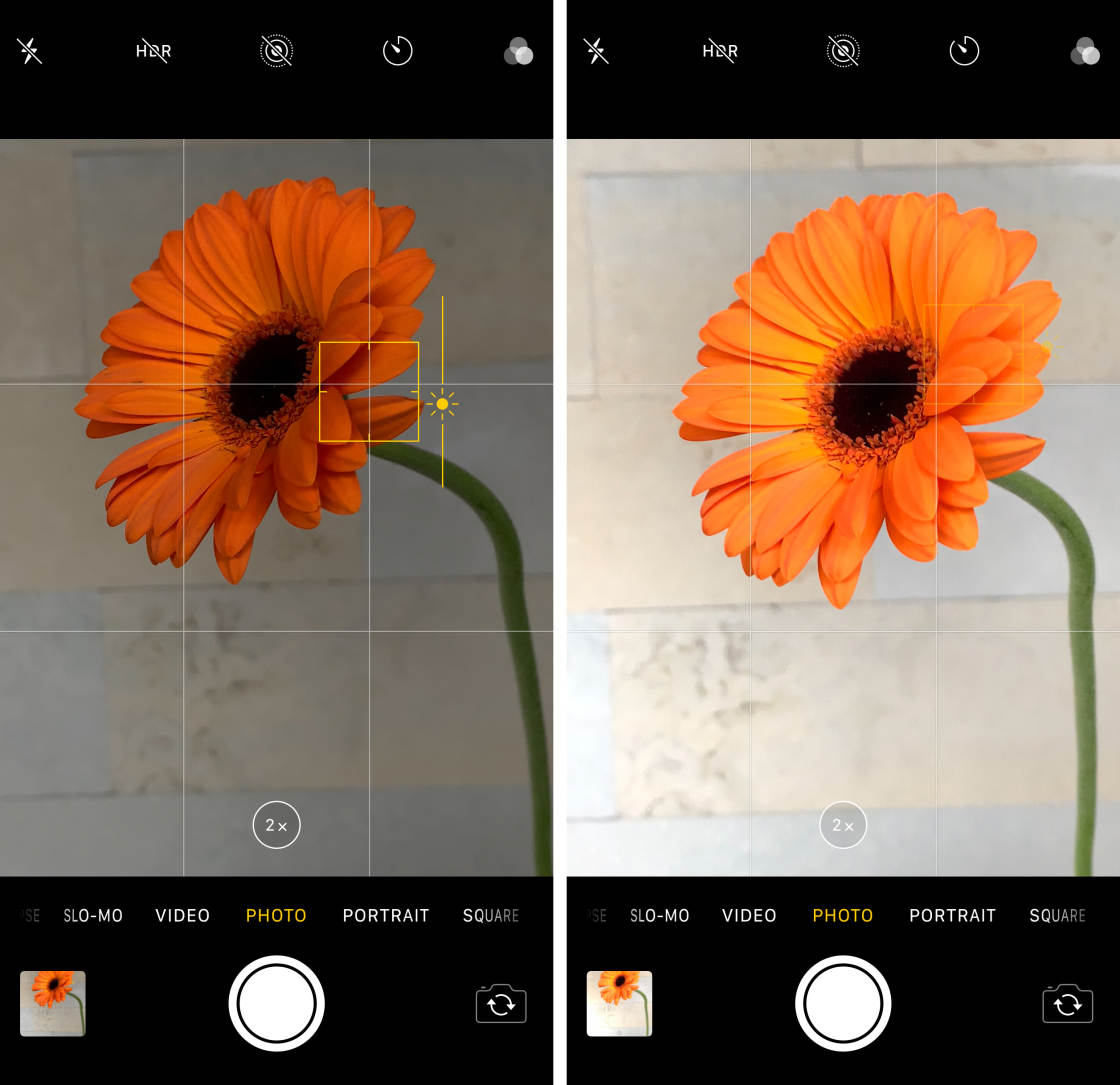
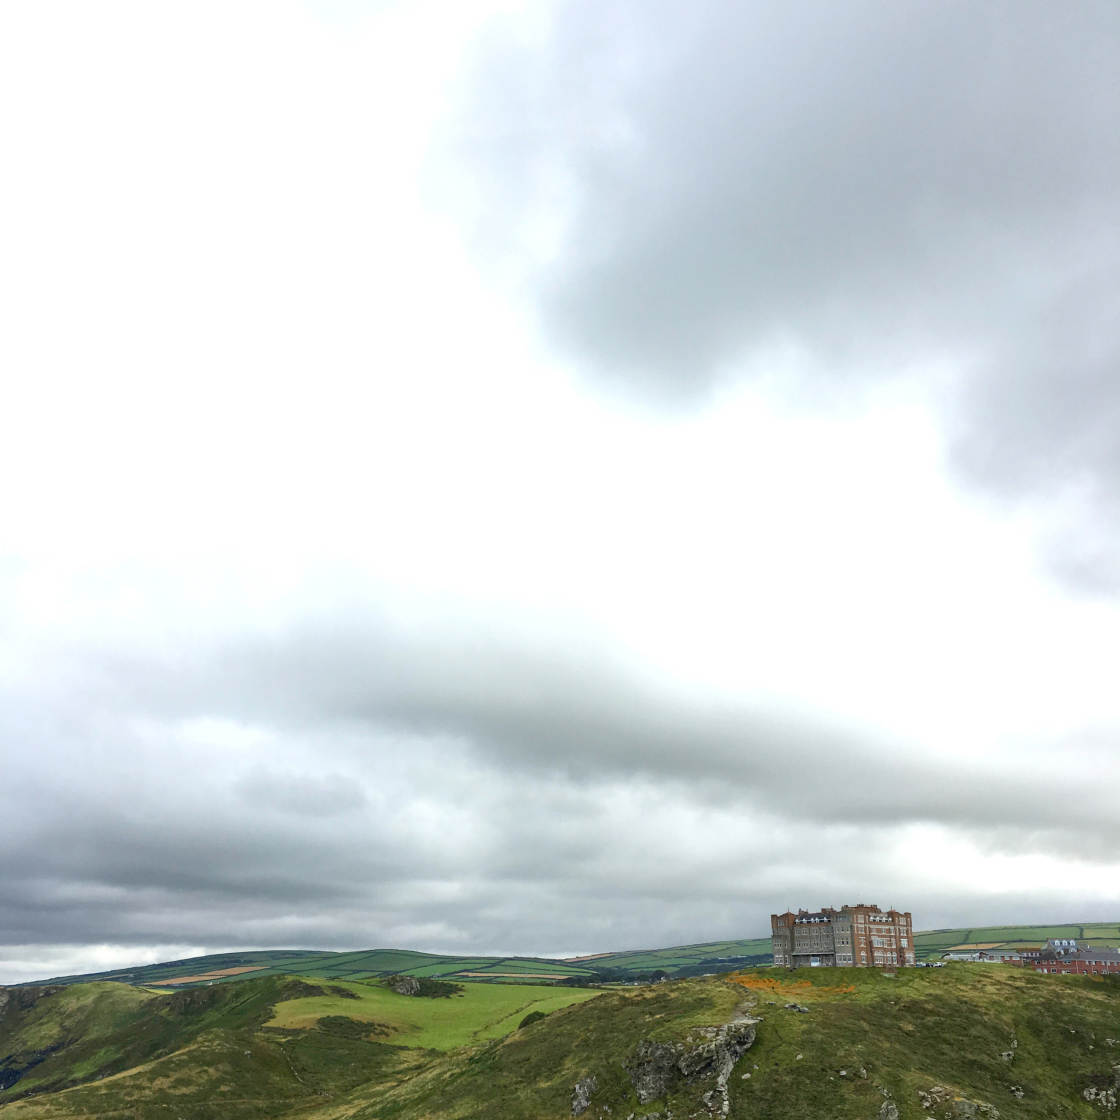
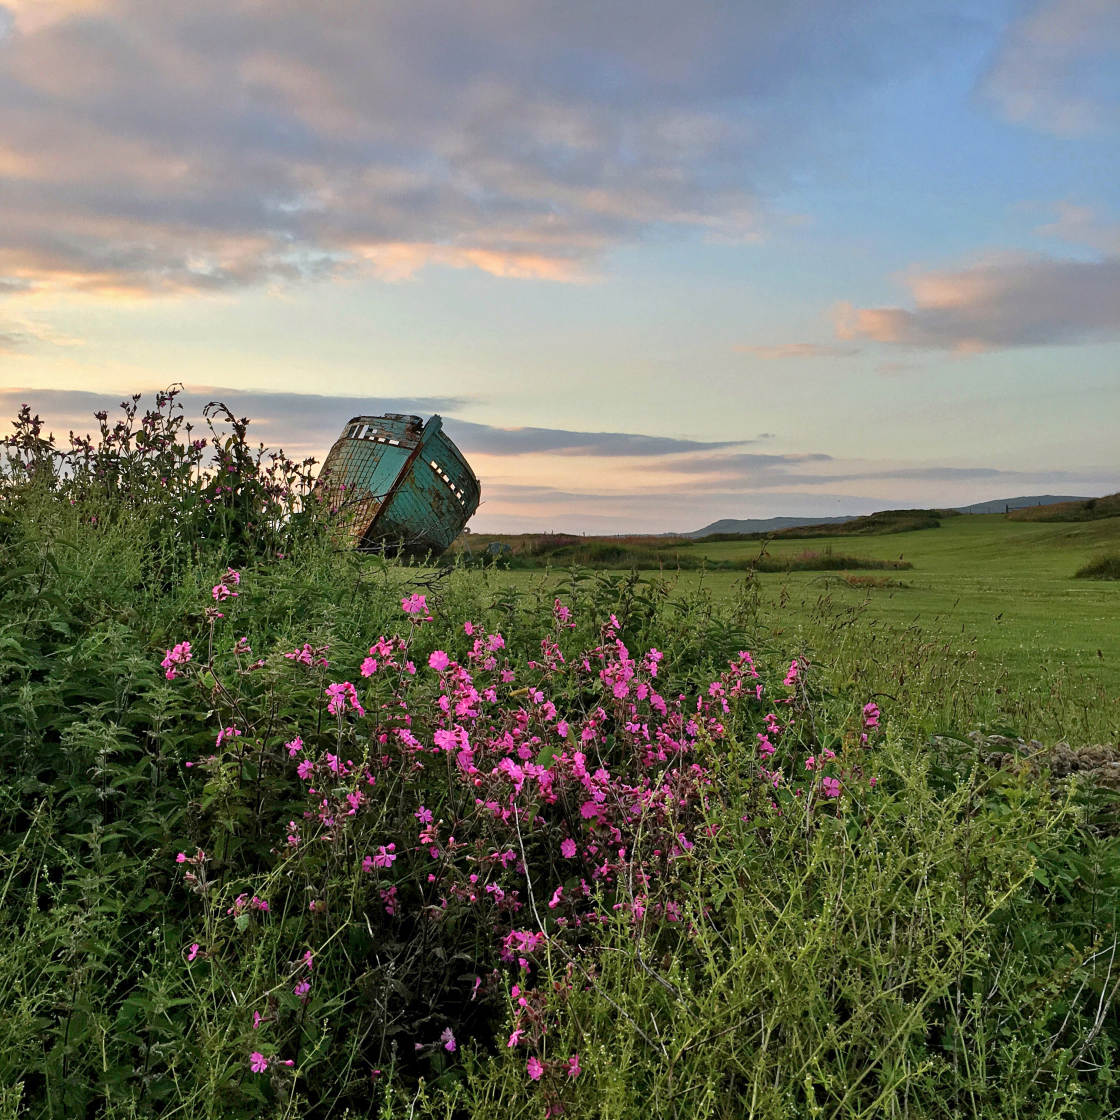
In the photo below you can run across the foreground is correctly exposed. Simply the sky has over-exposed areas that are far too bright.
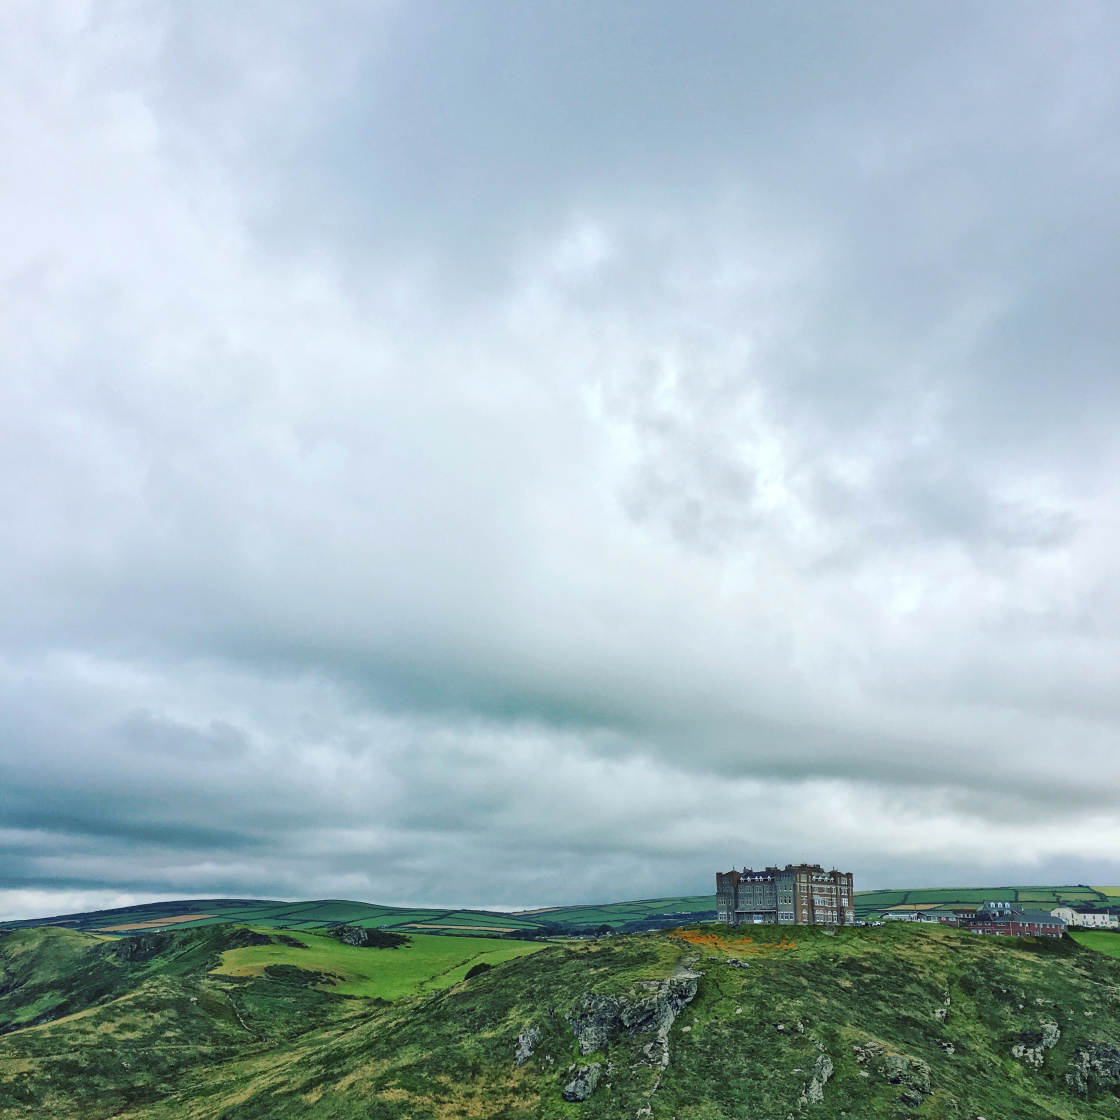
Using HDR lets you create a more balanced exposure with detail in both the dark and bright areas. The side by side photograph shows the same scene taken with the HDR setting switched on.
So how do you utilize HDR in the iPhone Camera app?
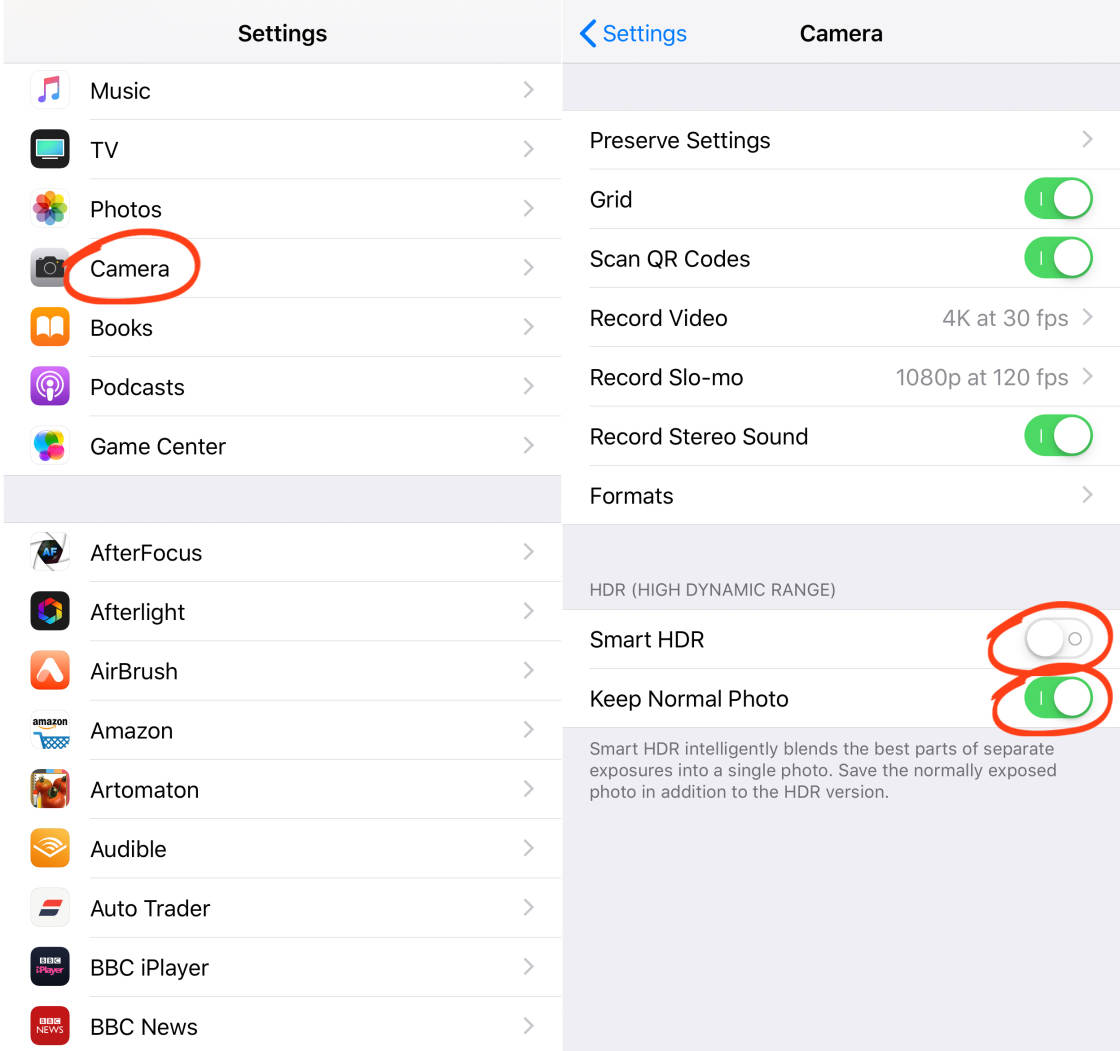
Outset of all, y'all'll need to check your iPhone's HDR settings. Become to Settings > Photographic camera.
EnsureSmart HDR is switched off (if information technology's on, you won't run across the HDR icon in the Camera app. Too, ensure Keep Normal Photo is switched on.
Open theCamera app. You'll run into the HDR icon at the peak of the screen. You can tap theHDR icon to switch the feature on or off.
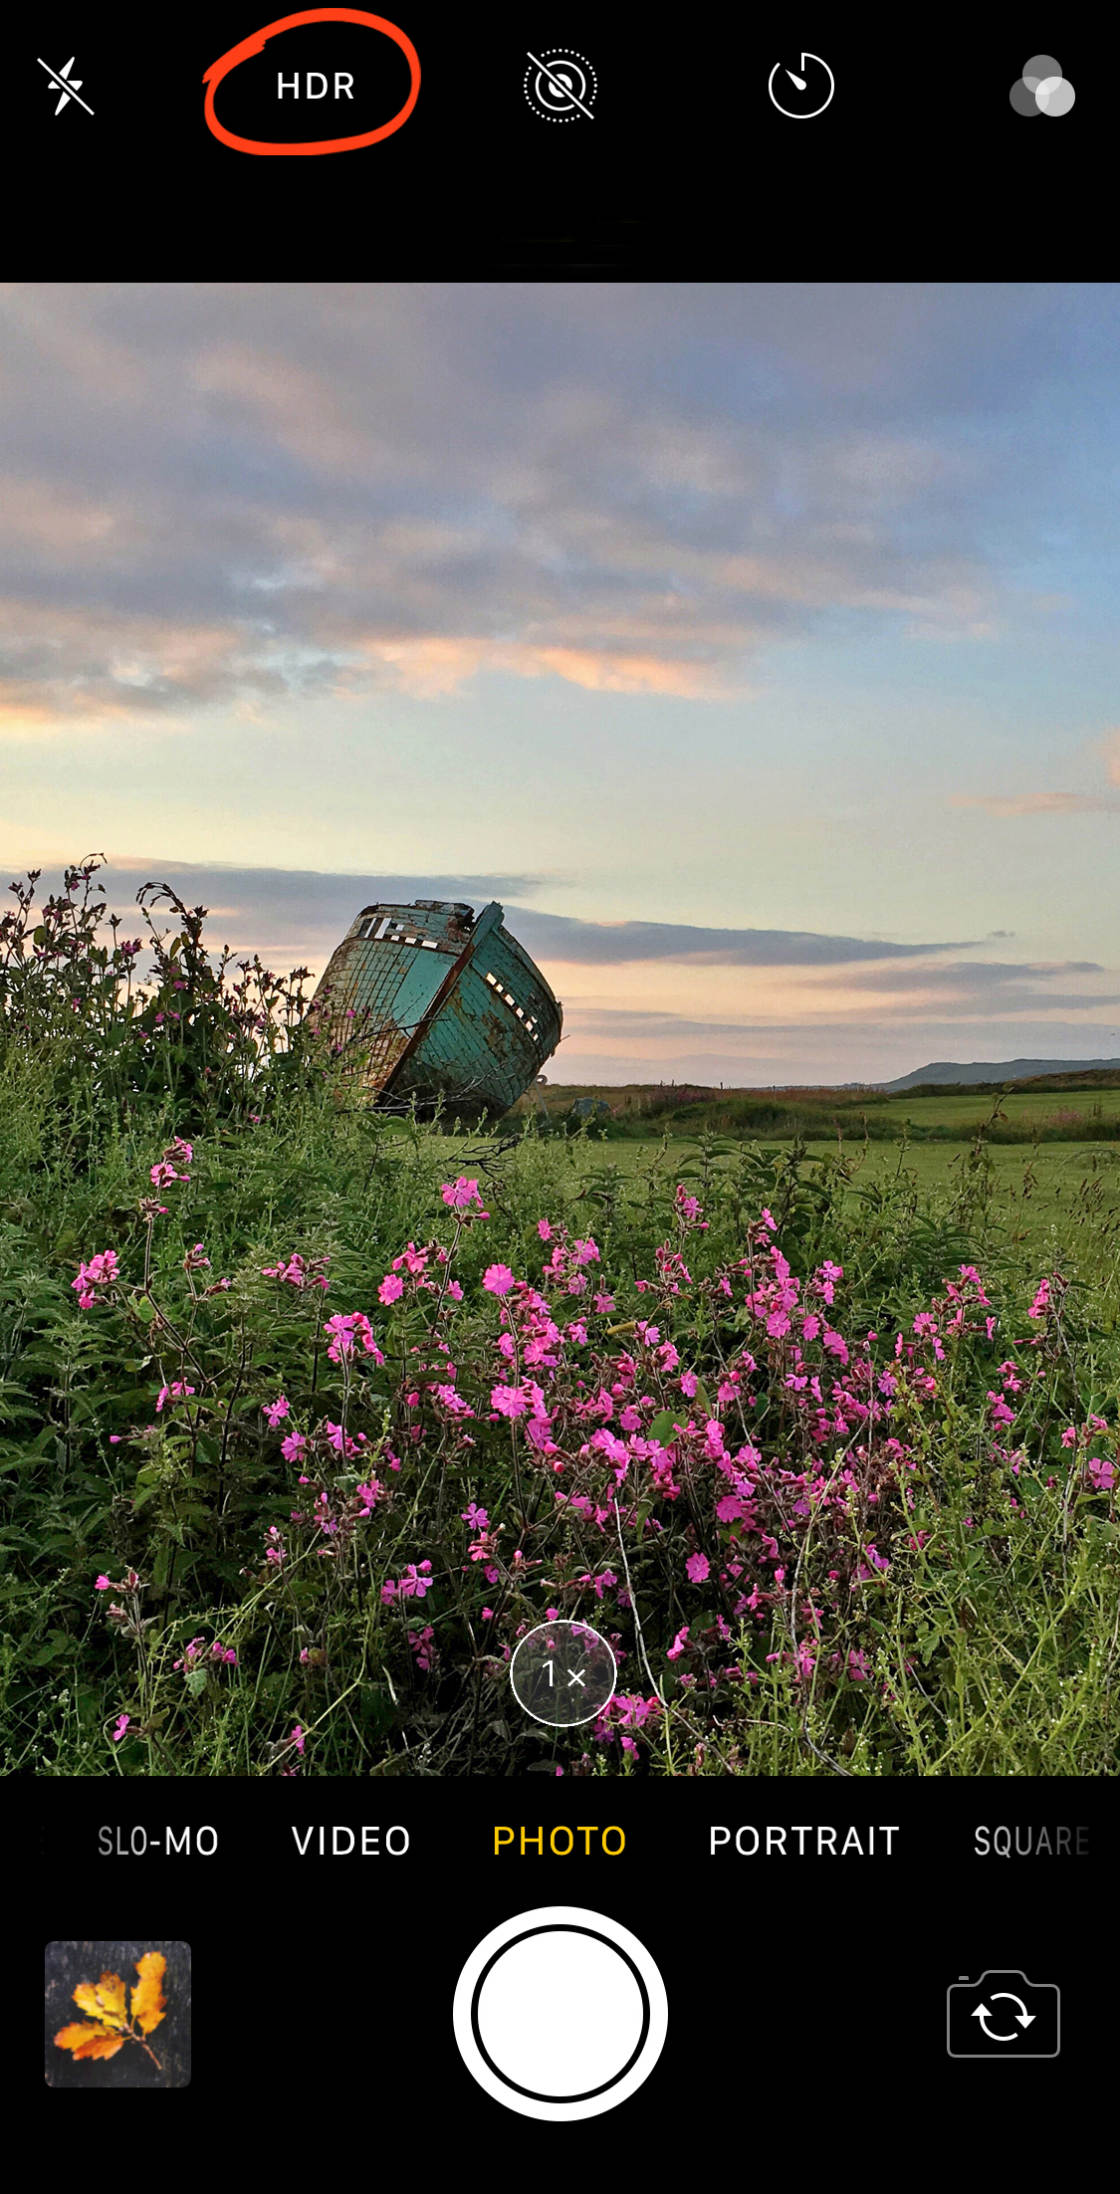
If HDR is switched off, the HDR icon will have a line through it. And so if y'all want to shoot an HDR photo, ensure the icon doesn't have a line through it.
Now all you lot have to do is etch your shot and press the shutter button.
The camera works behind the scenes to create a balanced exposure.
How does it practise this?
When yous printing the shutter, the photographic camera actually takes several photos at different exposures (from vivid to dark). It then combines these different exposures into a single photograph with good exposure throughout.
Information technology sounds complicated… but recollect, the camera does all this backside the scenes. All yous have to exercise is switch on HDR and shoot!
8. Take Photos With The Volume Buttons
Did you know that pressing the on-screen shutter push isn't the just manner to take a photo?
Y'all can also use the volume buttons on the side of your phone.
This is useful if you're holding your iPhone in horizontal orientation every bit shown below.
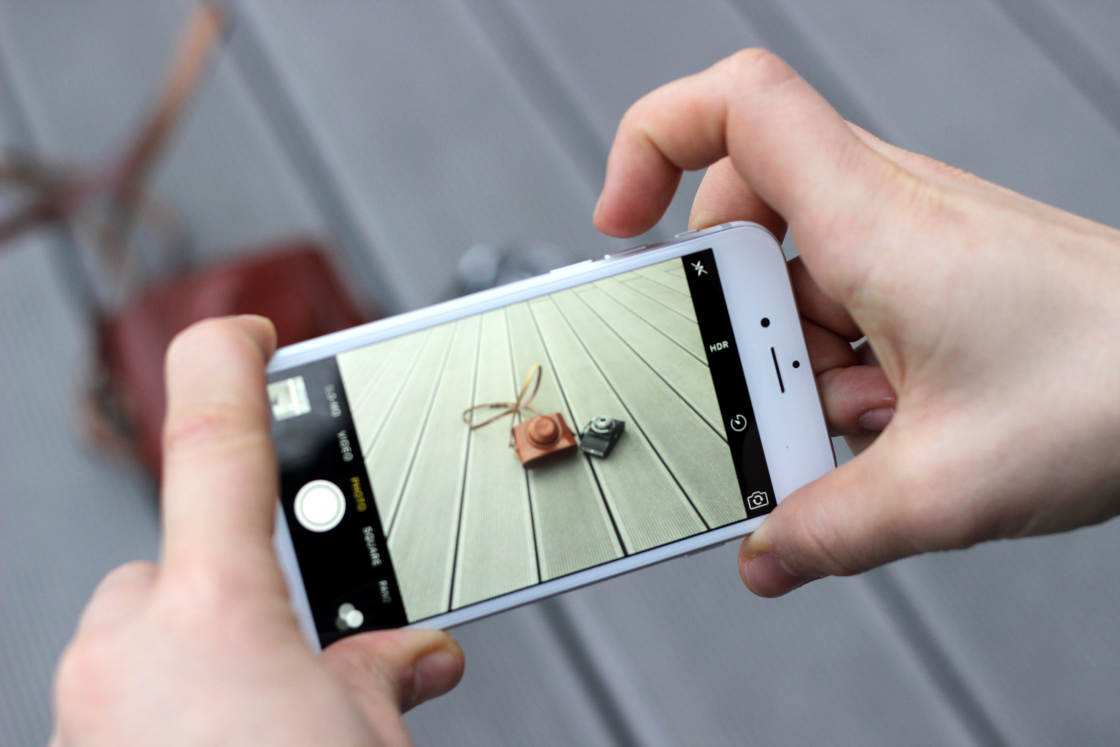
With your phone in this position, it can exist bad-mannered to printing the shutter button on the screen.
Using the volume buttons ways you can hold your phone steady with both hands while pressing the button with your alphabetize finger. This makes your iPhone feel more than like a traditional camera.
The 1 downside of this method is that you lot take to press the book button quite hard. This might crusade your phone to movement, resulting in a blurry photo. And so make certain you hold your iPhone really steady.
9. Shoot Discreetly Using Your Apple Headphones
Another lilliputian-known iPhone photography pull a fast one on is to use your Apple headphones as a shutter release. Connect them to your phone, so use either of the volume buttons on the headphones to accept a photo.

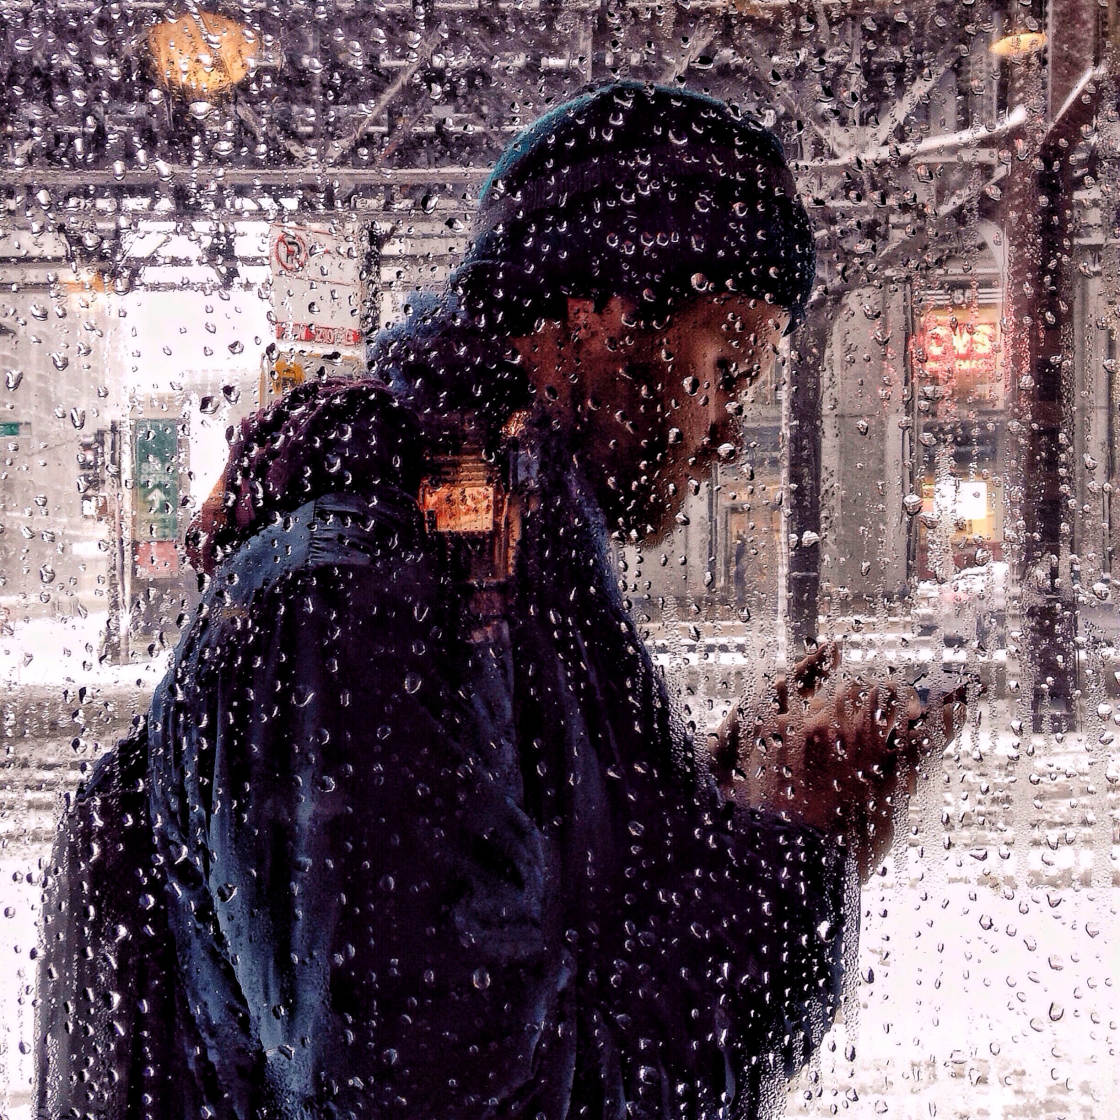
This method is swell when you want to be discreet while taking photos.
It'south perfect for street photography. Yous can pretend to be listening to music or making a call while you're actually taking photos.
Yous tin can also use your headphones as a remote shutter release when shooting with an iPhone tripod.
Even with a tripod, pressing the shutter push button on the iPhone screen can cause camera shake. But with your headphones, you can accept a photo without having to touch the phone at all.
A remote shutter and tripod are only ii of the 8 essential iPhone camera accessories that we recommend.
10. Record The Location Of Your Photos (And View Them On A Map!)
Did you know that your iPhone tin can record the location every time you have a photo?
This means you'll always know where you took a particular picture.
In the Photos app, you tin can search for images based on location. And you lot tin fifty-fifty view your photos on a map.
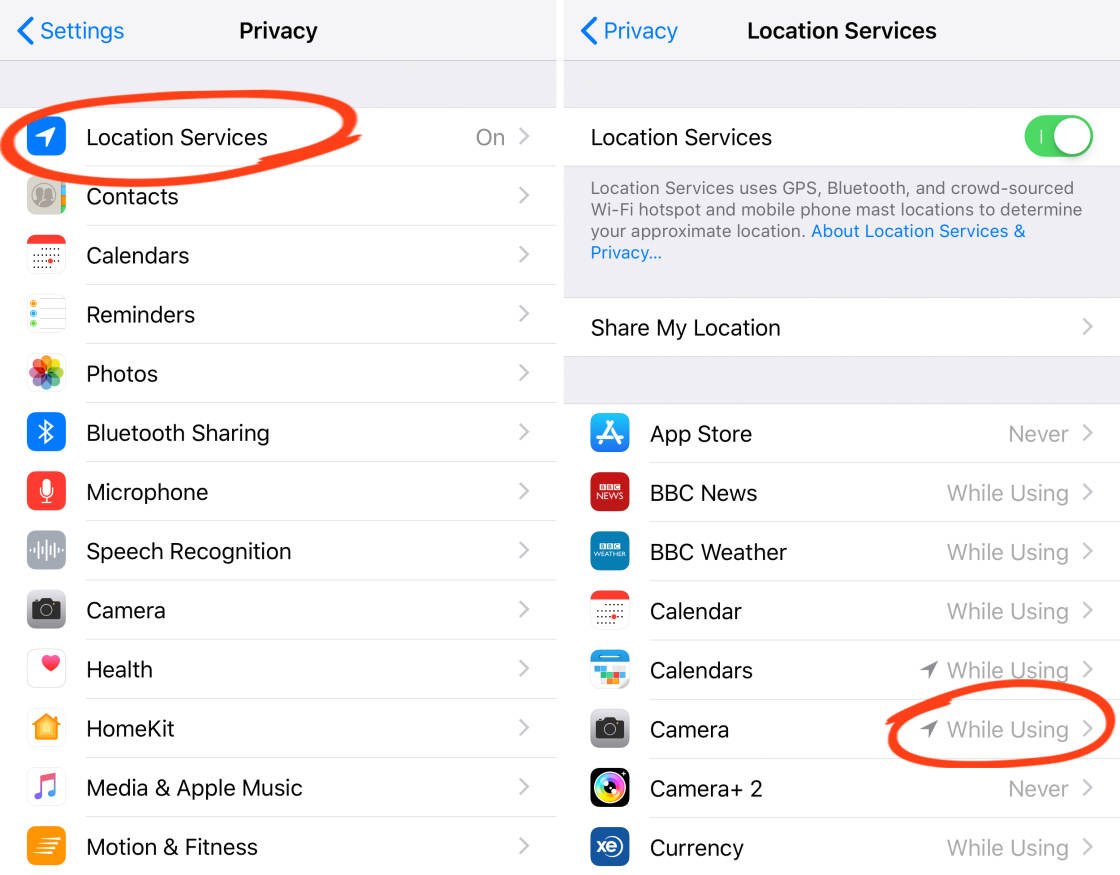
You lot can plow Location Services on or off by going to Settings > Privacy > Location Services. Ensure Location Services is on (green). And then ensure the Camera selection is gear up to While Using.
When you open a film in the Photos app, the name of the place it was taken appears at the meridian of the screen. Swipe upwardly on the photograph to view a map of that location.
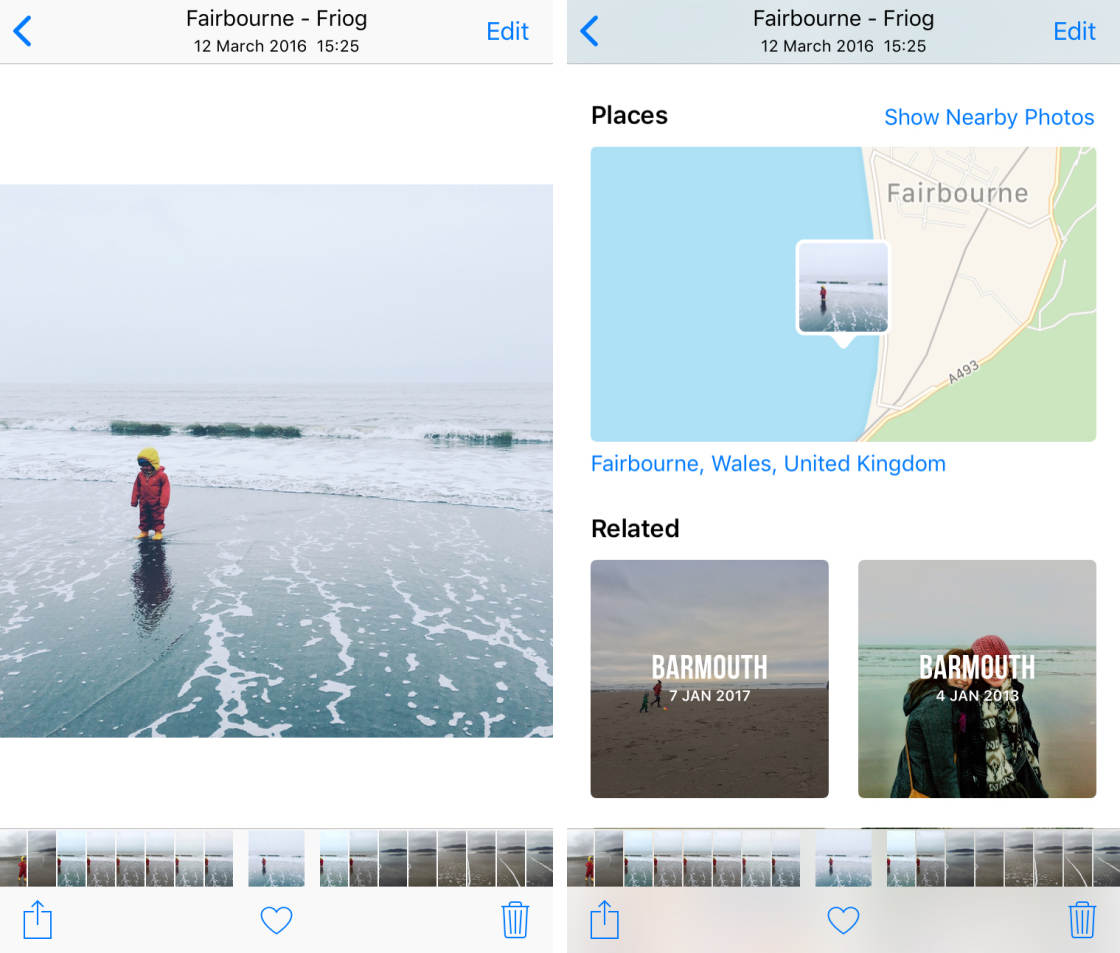
Note that the location will simply be shown if Location Services was enabled when you took the photo.
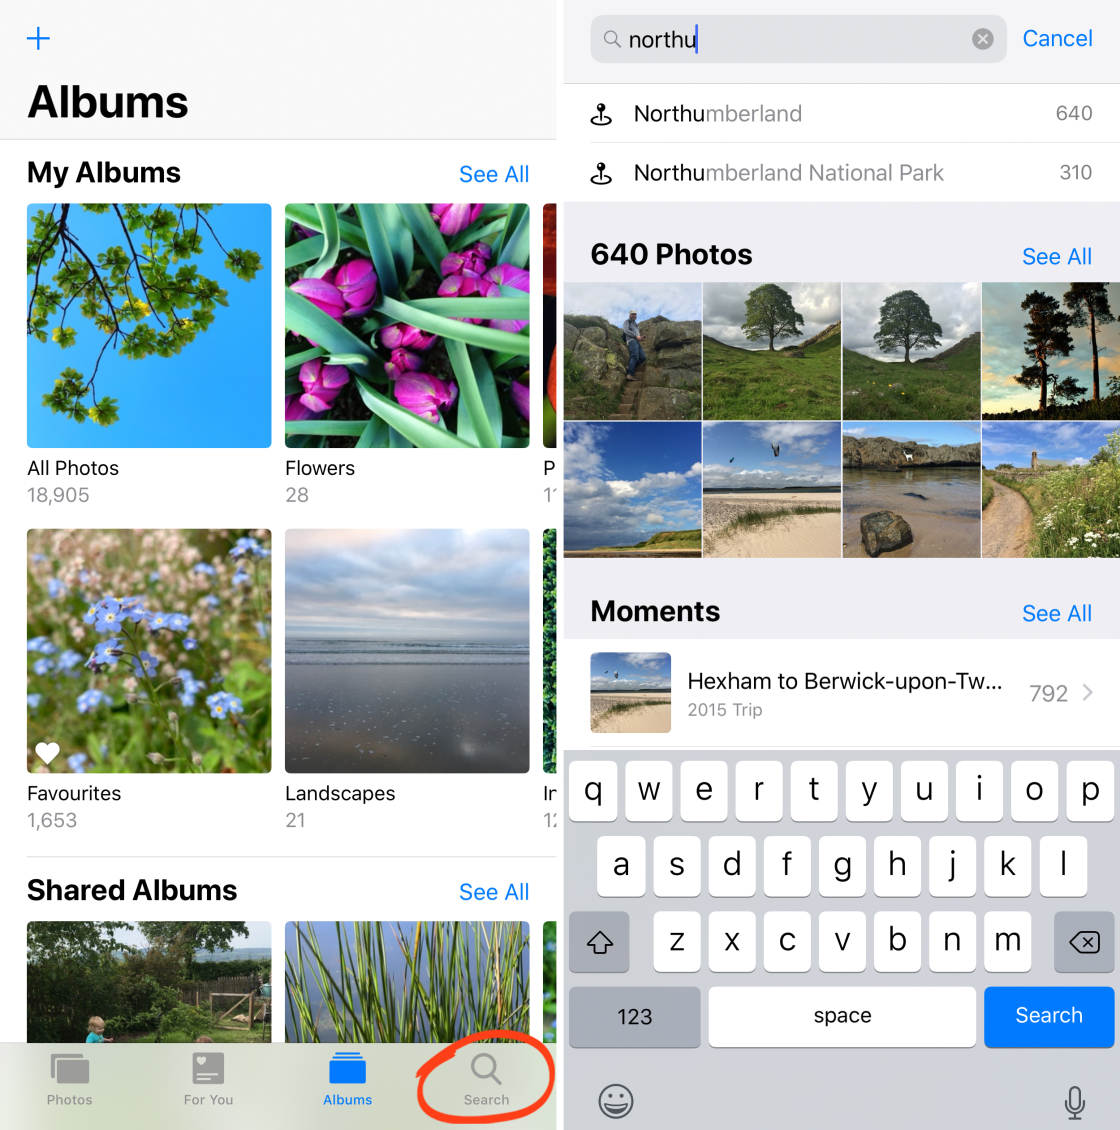
To find photos you took at a particular location, tap the Search icon (magnifying glass) at the bottom of the Photos app. Type the identify proper name into the Search box at the acme of the screen.
To view your photos on a map, get to the principal Albums screen of thePhotos app. Open the Places album and ensure Map is selected at the top of the screen.
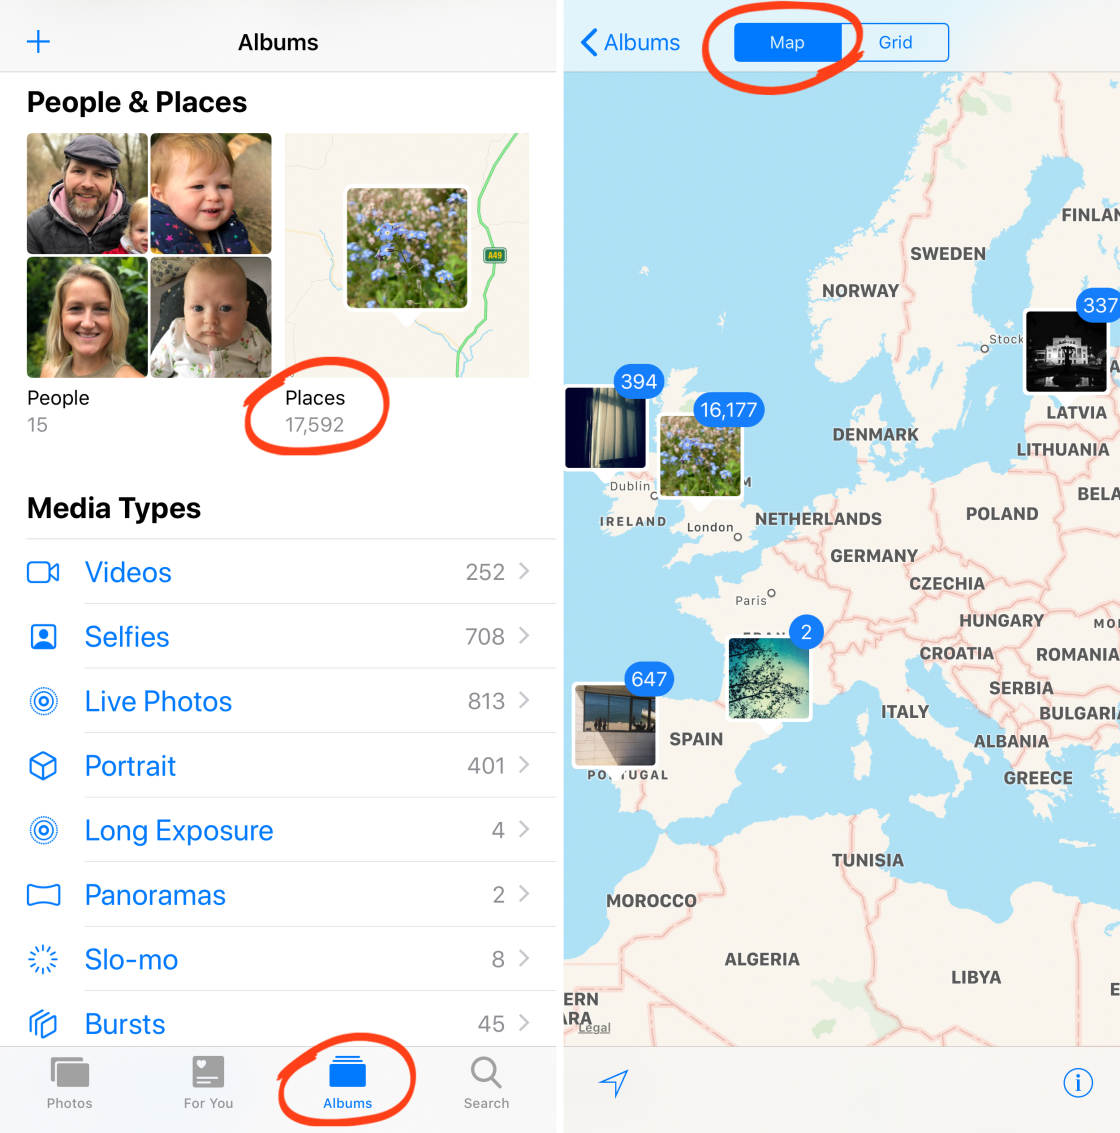
Pinch to zoom in or out on the map. Tap on a ready of photos to meet more than images from that location.
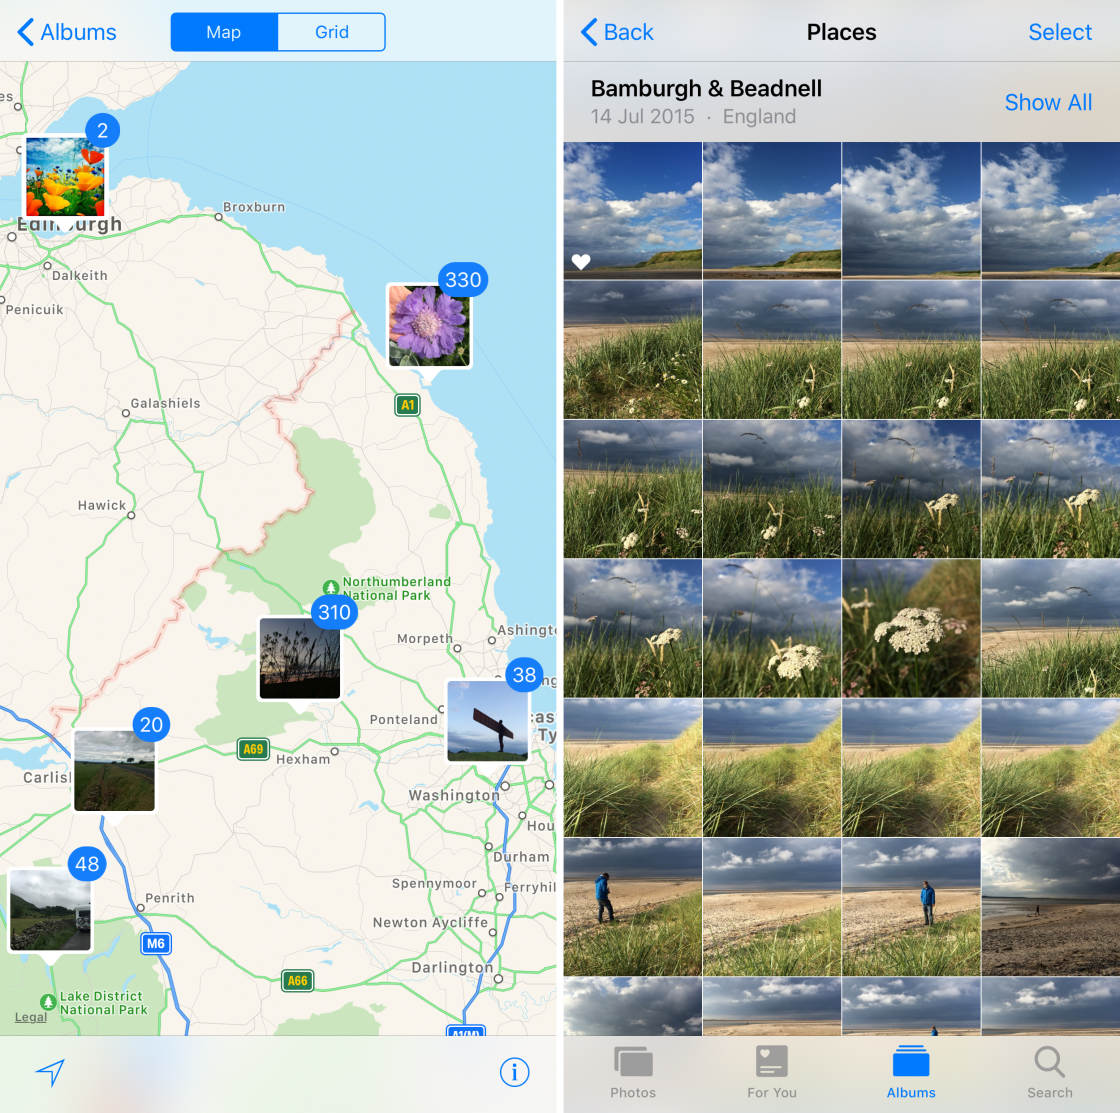
With Location Services enabled, your iPhone'southward photo library volition turn into an exciting collection of places you've visited.
And if y'all ever need to observe all the photos y'all took in a certain place, it only takes seconds!
Source: https://iphonephotographyschool.com/iphone-camera-features/
Posted by: ingramgerry1975.blogspot.com
0 Response to "Are Iphone Cameras Good Enough For Headshots"
Post a Comment